Revised January 12th, 2022
DASHBOARD NAVIGATION
The system administrator at your child’s school will determine which cards are being used on your Dashboard. Most implementations will not have every card mentioned below. If you would like to request a new card to be added to your Dashboard, please contact the system administrator.
SELECTING YOUR SCHOOL AND FORM
Each user is assigned a default location (school) and form which will be the default options your Dashboard lands on. The Dashboard differs from the legacy Homescreen and Dashboard in that it has memory – previously users were assigned a default form that they always landed on when logging in. The new Dashboard is capable of remembering which form you were using during your last login and will return you to it.
Users who have access to more than one school can change the location dropdown beside their name found at the top right-hand corner above the navigation menu. The form can be changed via the form dropdown.

LISTINGS CARD
The Listings Card provides a table with persons associated with a form and provides the ability to filter on all columns in the table and add new persons to the form.
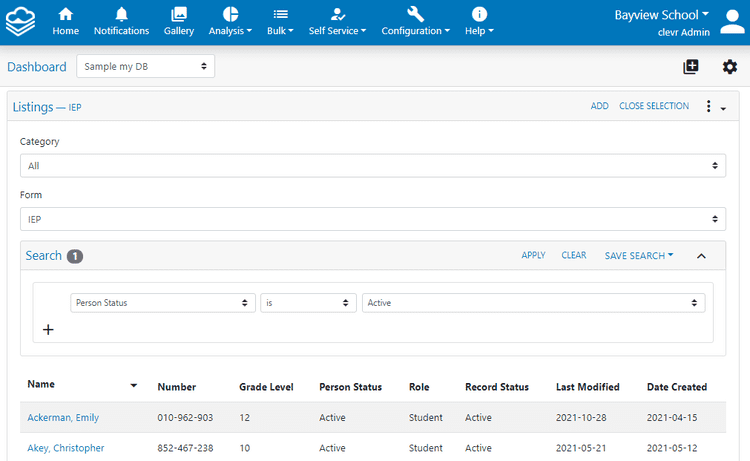
LISTINGS CARD – ACCESSING A RECORD
Click on any name within the Listings Card to navigate to that person’s record.

LISTINGS CARD – ADDING A PERSON
Persons (in clevr a person is the subject of a form and can include students, staff, locations, parents, etc) can be added to the currently selected form by clicking the Add button. To add a person to a form on a Listings Card:
-
Click the Add button at the top of the Listings Card.

-
Use the search field to look for the person you would like to add to the form. You can choose to run your search based on any searchable categories such as Last Name, First Name, Number, Status, Grade, or Role. Click the trash icon beside a field to remove that specific filter.
-
Click Apply to run your search. All persons who meet the conditions specified in your search will appear below.

-
Select your desired person by checking the checkbox on the left-hand column.

-
Click Add Selection button to add the selected student to the form the Listings Card is set for.


LISTINGS CARD – CATEGORY
As you grow your usage of clevr, you may find that your list of forms is getting long, which could take some time scrolling through to find the exact form you’re looking for. That’s why we have this particular Dashboard Card to help you organize and categorize forms by type, department or use case. Categories are created using the Form Management module and these categories are unique to your clevr environment. For example: Clinical Support Services or Parent Forms
Once your forms are categorized, the category names will appear within the Category dropdown. The Category dropdown has default All or Uncategorized options. The Category dropdown will expand all forms listed under the category you’ve selected.

MY FORMS CARD
The My Forms Card provides an easy way to see forms that are assigned to the user that is logged (sorted by most recent). This is primarily used within implementations that use staff forms. To view your record for a form within the My Forms card, simply click on the form name to open the record.
The Add button allows the user to create a new record for themselves. This process always adds a blank new record and once the record is created, it opens up the record.

In the Add Form window you will be prompted to select a location and form (for the selected location). The Location field lists all active locations for the tenant while the Form field will display the list of forms associated with the role.
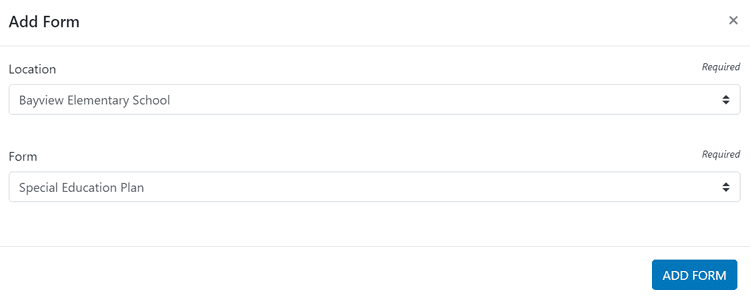
Clicking the Add Form button will create a record under your name for the specified form and will navigate you to the newly generated record.
STUDENT RECORD ACCESS CARD
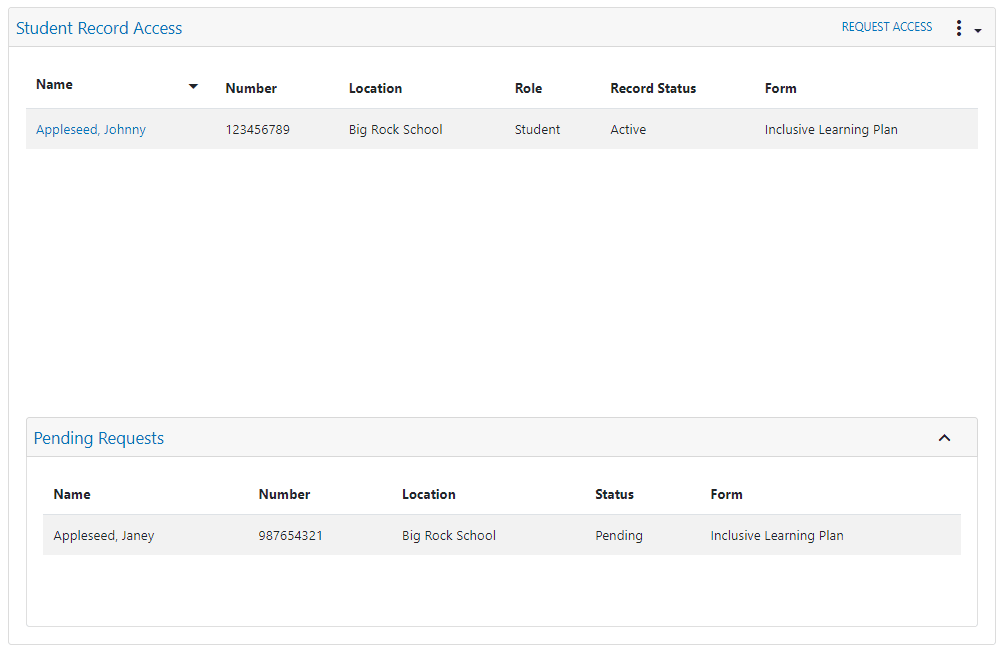
The Student Record Access Card provides a list of records that the user has access to, and allows users to request access to specific students’ records. The list in the Student Record Access Card only displays active records.
Approved access will appear at the top of the card within the Student Record Access portion. Previously submitted requests awaiting approval will appear within the bottom Pending Request portion.
STUDENT RECORD ACCESS CARD – REQUEST ACCESS
The Request Access screen allows a user to request access to either an existing record or to add a new student/registration to clevr. This is primarily used for clevr Tenants that have Parent Access permissions.

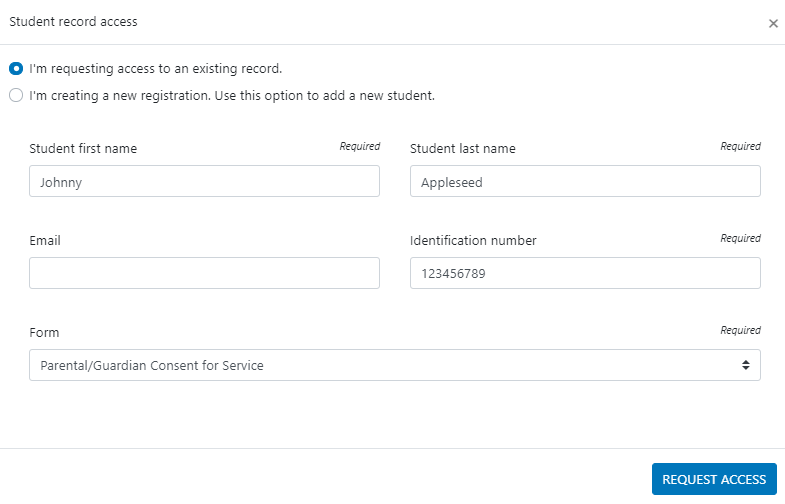
If you are requesting access to a student currently enrolled within the district, select the I’m requesting access to an existing record radio button. If you are registering a new student into the system, select the I’m creating a new registration. Use this option to add a new student. radio button. The Form dropdown displays a list of forms your role has permission to access. Once you’ve entered the appropriate information, click Request Access to submit your request.
If you register a new student, the record will be immediately created and available within the Student Record Access card. You can click on their name to open the record.

If you request access to an existing student’s record, the request must be manually approved by school staff. These requests are reviewed manually and may take some time for approval. Pending requests will be viewable within the Pending Requests bottom portion of the Dashboard Card. Once approved, the record will appear within the top portion of the Dashboard Card.

STUDENT RECORD ACCESS CARD – REMOVE ACCESS
This option allows you to remove a record from their Student Record Access Card list. Click the icon of the three dots in the top right corner of the Student Record Access Card. Within the popup window, check the checkbox beside the name of the student whose record you would like to remove, then click the Remove button.


Once removed, if a record has a status of Active, then the Remove action should set the status in groupings to Archive.
HAVE QUESTIONS? WE’RE HERE TO HELP
BROWSE ONLINE SUPPORT
clevrcommunity.ca is a convenient place to find information about clevr features, recent updates, webinar recordings, how to submit a support ticket, and more. Check it out:
- Help Docs
- FAQ
- Webinar Recordings
- Release Notes
- Announcements
- Submit a Support Ticket
TALK TO A LIVE AGENT
If you prefer, you can also get in touch with us by phone at 613-966-6806. Our knowledgeable staff is technically trained and available to assist you.
