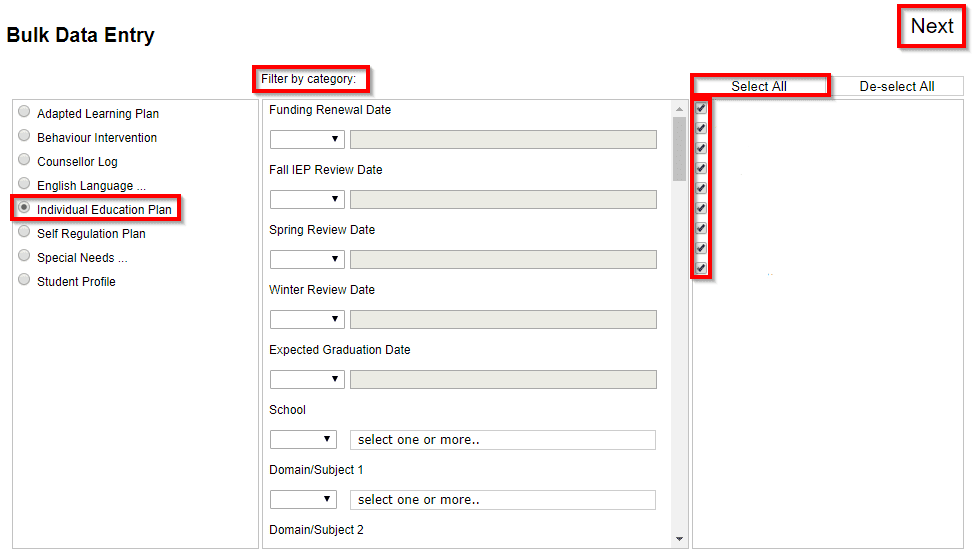
Bulk Data Entry is used to populate the same value into multiple records at a time. Before you navigate to the Bulk Data Entry module, select the appropriate school in the top right location dropdown. You can access the Bulk Data Entry module on the Homescreen via clicking on Bulk > Bulk Data Entry.

Select your form in the left hand column.
The middle column is used to apply a filter if you are looking for a specific subset of students (Ex: Grade 3s who have the teacher Jane Smith). Applying a filter is not required so this step may be skipped – you can manually select which records you would like up update in the right hand column. When the appropriate records have been selected, press Next.

In the Bulk Data Entry Specifics screen, the Records to be Updated column will display the list of students you selected in the previous input screen. In the middle column, you can select which fields you would like to be updated.
In Bulk Data Entry Options you have three choices:
-
Create new record – This will make a new record with no data except the content you added in the Fields to be Updated column
-
Update existing record – This will update the specified fields in the current record. Any data that was in those fields before the Bulk Data Entry was performed will be overwritten.
-
Record rollover – This is a specific action used to archive records between semesters or in the summer to prepare records for the next school year. Selecting this option will make a clone of the existing record and lock the previous record within the record history. This should only be used during specific times in the year to archive records by district level staff.
You can assign a new name to the record in the Record Description field. You will be able to see the name of the record within the Record History screen.
In record status, you can choose between Active or Locked. Selecting Locked will make the most recent record have a read only status applied to it. You will almost always want to select Active.
When all these steps are complete, press the Update button.

It will take a few moments for the Bulk Data Entry to process. Please be patient while this takes place. In extreme cases such as having a slow connection or updating a large number of records, it can upwards of 20 mins to process.
While the Bulk Data Entry is processing, DO NOT close the window, click the back button, or take any action to interrupt this process as you run the risk of ruining your records.
When the Bulk Data Entry is complete you will receive a pop up telling you that records have been updated. If it processed for an exceptionally long time, your page will refresh to the login screen. This is OK! When you log back in your records will be updated.

