| Table of Contents |
Record Rollover Wizard
Revised June 20, 2023
Overview
![]() Page rights
Page rights
To access this feature, the Record Rollover Wizard page right is required. A role will also need the Form Manager to flag forms with the rollover style.
![]() Common usage
Common usage
This feature is used by System Administrators to manage Record Rollovers.
![]() Considerations
Considerations
Best suited for system administrators, not end users.
A Record Rollover is a process used within clevr to archive records. It is typically performed once a year, usually during the summer after data entry within the current school year’s records is complete.
Depending on preference, a rollover may happen once a year when data entry for a form is complete, or between school semesters. Most Districts/Divisions opt to rollover records once a year.
The clevr Record Rollover Wizard provides users with an end-to-end solution, simplifying the record rollover process while facilitating a greater level of independence. It walks the user through the process step-by-step to ensure that the desired forms are being archived and cloned in a conducive and purposeful manner.
Identifying Forms for the Rollover Process
Whether a Record Rollover happens will depend on the nature of the form. Forms used for yearly documentation such as IEPs, IIPs, IPPS, etc. typically require a “Copy Data Into New Record” Record Rollover. Forms that capture a record of specific or one-time events typically require a “Lock Existing Record” type of rollover where the records are bulk locked without a new or cloned record prepared. Examples of such forms include Field Trip Permission forms, VTRAS, Incident Reports, etc. Logs are a style of form that do not require any sort of rollover – users click new record when they need to create a new entry. Forms that are good candidates for a “Create New Record” style rollover are ones where the person will need a record next year where none of this year’s data will apply, for example Literacy assessment forms, Math assessment forms forms, Teaching Evaluations, etc.
The easiest way to locate a list of your forms available in clevr is through the Form Management Module. This module will also provide details with regards to whether the form has been flagged for a rollover.
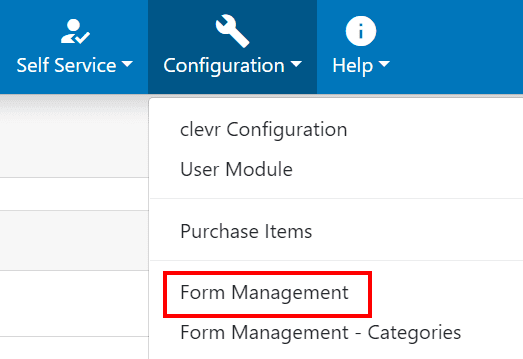
To access the Form Management Module, go to the Configuration Menu on the clevr Navigation menu and select Form Management.
The Form Management Module will display a list of the forms that are available on your tenant. To the right of the form name, you will be able to identify whether the form is tagged to be included in the Record Rollover process.
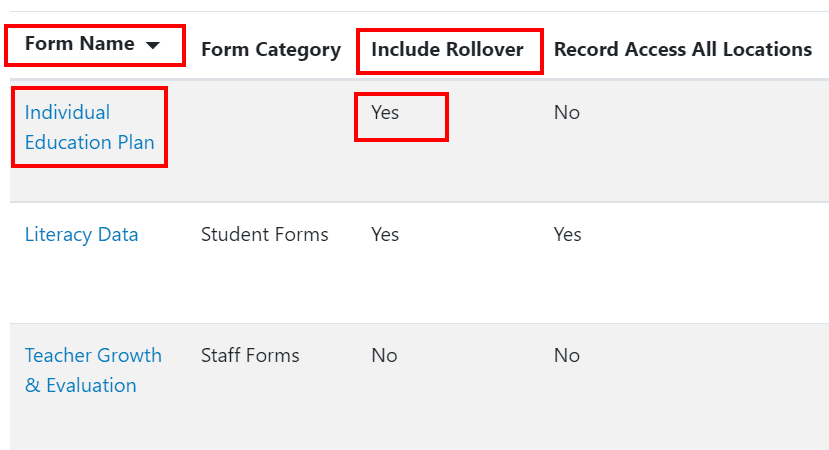
If a form listed has not been flagged for Record Rollover and you wish to add this to the Rollover Wizard, click on the name of the form within the Form Management window.

This will bring you to the Form Details page where you can edit the properties of the form. At the top of the page, within the Details header click on the Edit button:

This will bring up the Form Details window where you can select the Include in Rollover – Default is bulk lock existing records checkbox.

After selecting Include in Rollover, you can specify the Rollover Type for this form.
-
Include in Rollover – Default is bulk lock existing records – Will add the form to the Record Rollover Wizard so that it can be processed for archiving. Selecting this option will default to Locking of Existing Records.
-
Create New Record in Record Rollover – This option will add the form to the Record Rollover Wizard so that it can be processed for archiving. This will lock all existing records for the current school year and create a new blank record for the upcoming year.
-
Copy Existing Data to the New Record in Record Rollover – This option will add the form to the Record Rollover Wizard so that it can be processed for archiving. This will lock the previous year’s record and create a cloned record which mirrors the previous year.
For more information on Rollover Types please see the Step 4: Understanding the Three Rollover Styles within this article.
Step 1: Intro to the Rollover Process
To access the Record Rollover Wizard, go to the Configuration menu in the clevr Navigation Menu and select Record Rollover Wizard.
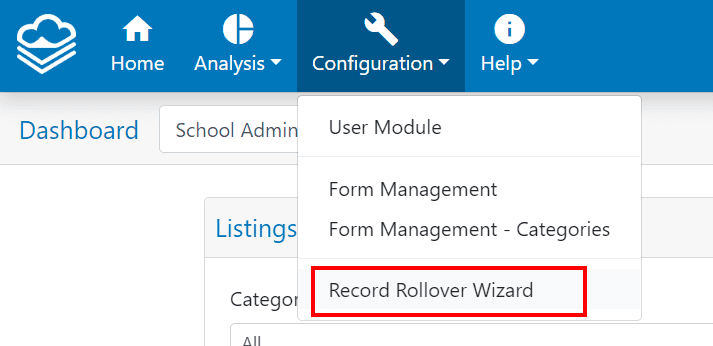
This will bring you to the Record Rollover Wizard and will provide details including what a rollover is, what forms require a rollover and why it is important to include this in your yearly maintenance schedule.

At the bottom of the Record Rollover Wizard you will see a summary of your past Record Rollovers, including:
-
Form Name – The form that was archived during the rollover
-
Last Rollover – The date the rollover occurred
-
Location(s) Selected – The locations included in the record rollover
-
# of Records – The total number of records processed by the record rollover
-
Performed by – The clevr user that performed the rollover
-
View Details – Clicking this button will open a pop up window where you can see:
-
The list of locations where the rollover was performed
-
The record description selected
-
Which fields were bulk updated with the rollover
-
A list of all records that were impacted
-
The ability to undo a rollover
-

The Record Rollover Summary is beneficial for auditing your previous and current rollover status.
Assessing New Forms for Fields that Require “DoNotClones”
If you have a form that will have a cloning style rollover, it’s possible to flag specific fields on the form with a Do Not Clone attribute. Using this attribute will allow that element or tab to be blank when the clone is made. This is a great option for fields where the data will not apply next year that will be cumbersome to manually remove. Some examples of fields that need Do Not Clones are:
-
Subjects tabs on an IEP
-
Signature sections
-
Notifications
-
Locking triggers
By default all fields will clone, so if you do not want this data present within next year’s record you need to make sure they are flagged with this attribute.
If you have access to the clevr Form Editor you can check out this document to learn how to apply Do Not Clones independently. If your implementation does not have any clevr Form Editor trained users, you can contact support@clevr.ca to configure this setting. We will need to know the form name, tab name, and field name where this should be applied.
Step 2: Selecting Locations
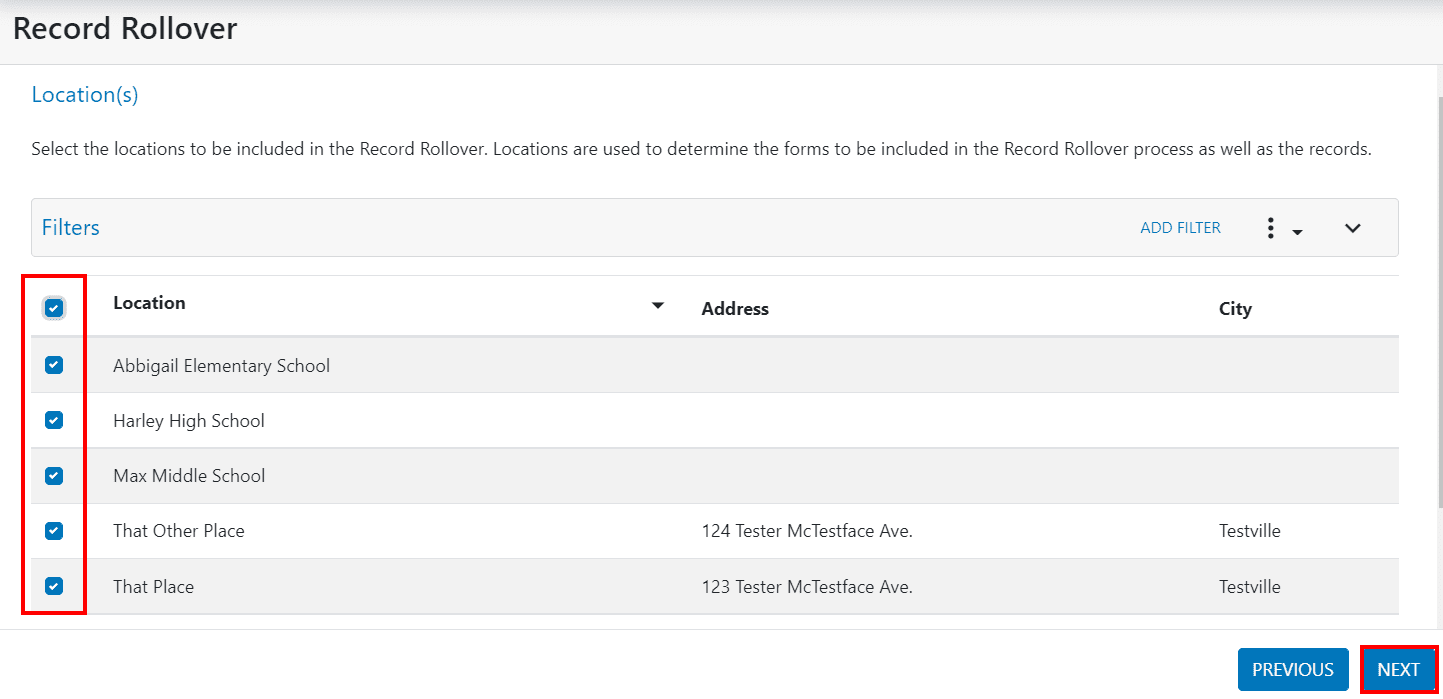
Within the Location window, you will be prompted to select a location or locations that are to be included in the Rollover. Locations are used to determine the records that are to be included in the Record Rollover process.
If the Rollover Wizard detects that your user account is missing one or more location(s), it will deliver messaging to warn you that the locations you do not have access to will be skipped. If you get this message and are supposed to have access to all locations, before you perform your rollover you should update your account to include all locations.

To select the locations that should be included in the rollover, click on the checkboxes that are beside each location. Once selected, click the Next button.
Step 3: Selecting a Form and Rollover Type
Selecting Your Form
In the Form window, you will be prompted to select a form for archiving. The forms that are listed here will be based on the location that was chosen on the previous screen Step 2: Selecting Locations.
Click on the dropdown menu to select the form that you wish to Rollover.
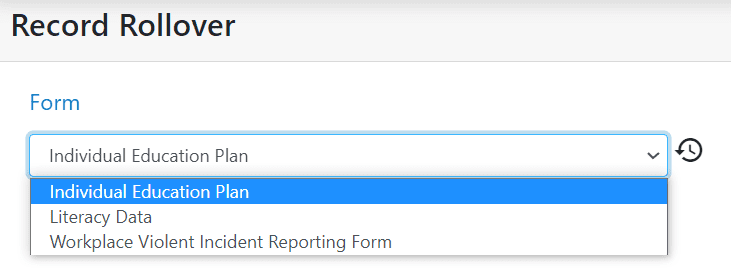
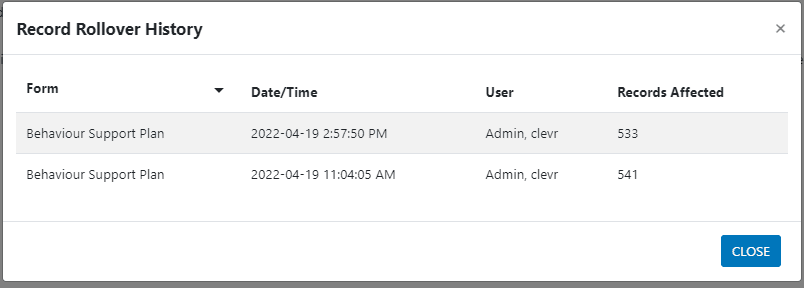
After making a selection, a clock icon will appear to the right of the form name. Clicking on the clock icon will display the Record Rollover History for the form outlining:
-
The name of the form
-
The date and time a rollover was processed for the form
-
The user that completed the rollover
-
The number of records that were affected during the rollover process
Selecting a Rollover Type
After you have selected the form from the Form dropdown menu, you will be prompted to select the type of rollover you want to complete.
The Rollover type will allow you to specify what happens to the records during the rollover process. Here we have 3 options to choose from:
-
Lock Existing Record – Choose this option to lock existing records. This option will lock all records without preparing a blank new record for next year. New records will be created manually.
-
Create New Record – Choose this option only if you’d like to make a blank new record for next year in addition to locking the previous records. If you would like a cloned record instead of a blank one, ensure you select the next option.
-
Copy Data Into New Record – Select this option if you’d like to copy the data from this year’s record into the record you are creating for next year in addition to locking the previous records. Selecting only “create new record” without this option will make the new record blank. Data within all fields with the exception of those flagged as donotclone will be available within the cloned record.
After you have selected the form for archiving and the type of rollover, click Next.
Step 4: Understanding the Three Rollover Styles
Rollover Type – Lock Existing Record
Locking the existing record locks the past records while making it accessible within the Record History. This is a great option for forms about a specific or one time event where the person is not guaranteed to need a record for next year. Examples include VTRAs, Incident Reports, Referrals to Clinical Services, Grade 8 Transitions, etc.
If the person also needs to be removed from the Listings Card, you can select the Archive Person From Listing Card option. This feature removes the person from the Dashboard Listings Card so that they are no longer visible when viewing your records. If you choose to archive persons from the Listings, you will be required to manually add them back if they require a record and this action can not be undone.

Rollover Type – Create a New Record
Creating a new record will lock last year’s record and create a blank record for each person/location that has been selected. This is a great option for records that will be needed for the next school year, and where the current year’s data will not apply. Examples of forms to include are Teacher Evaluations, Math Forms, Literacy Forms, etc.
If you would like a cloned record created for the upcoming year, please refer to Rollover Type – Copy Data Into New Record.
When creating a new record, clevr will prompt you for a name of the new record. This name should indicate that it is for the upcoming school year.

Next, we can choose to exclude students in specific grades if applicable. If you select this option, the grades excluded will have this year’s records bulk locked without a new or cloned record created.

Depending on how your form is customized, you may be prompted to populate information into specific field(s). The fields available for updating will be listed under the header titled The following fields have been flagged to accept new values when a record is created.
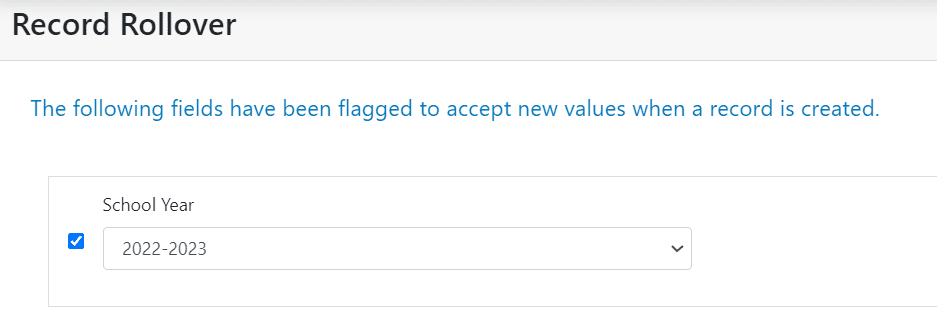
The fields that are displayed here have been flagged on the form so that they are updated during the Rollover season. The fields listed can be updated with the data that you wish to see on the newly created record.
Rollover Type – Copy Data into a New Record
The Copy Data Into a New Record feature is very similar to creating a new record. The difference between these two features is that copying data into a new record copies all of the data in the existing form to the newly created form with the exception of fields flagged with a Do Not Clone attribute. Examples of forms that are good candidates for this rollover type include IEPs, IIPs, IPPs, Student Plans, etc.
When copying data into a new record, clevr will prompt you for a name of the new record. This name should indicate that it is for the upcoming school year.

Next, we can choose to exclude students in specific grades.
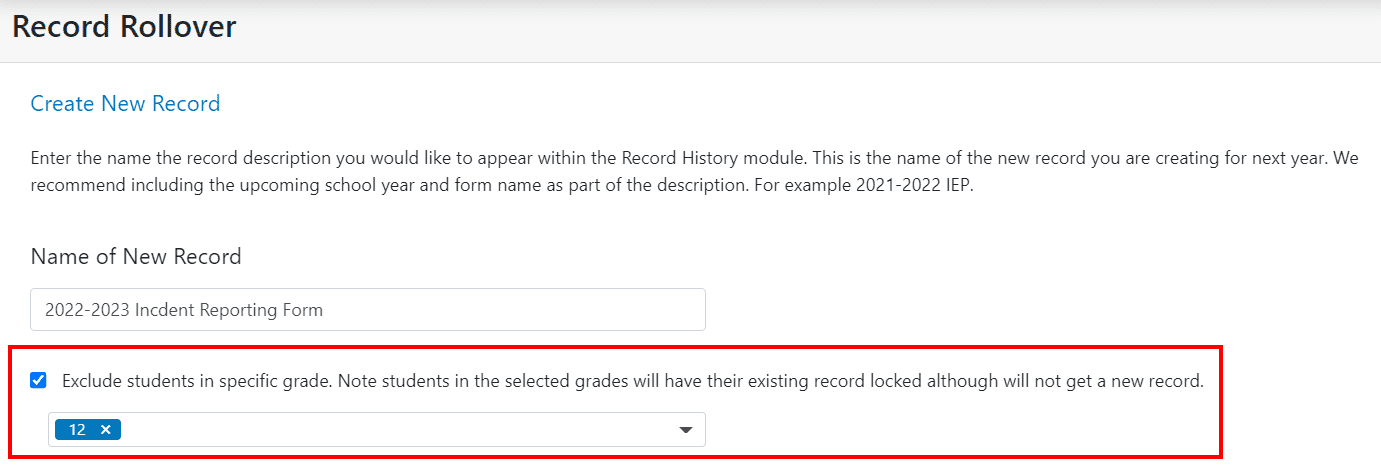
This will lock the previous year’s record for the grade that has been selected and prevent a new record from being created.
Depending on how your form is customized, you may be prompted to populate information into specific field(s). The fields available for updating will be listed under the header titled The following fields have been flagged to accept new values when a record is created.
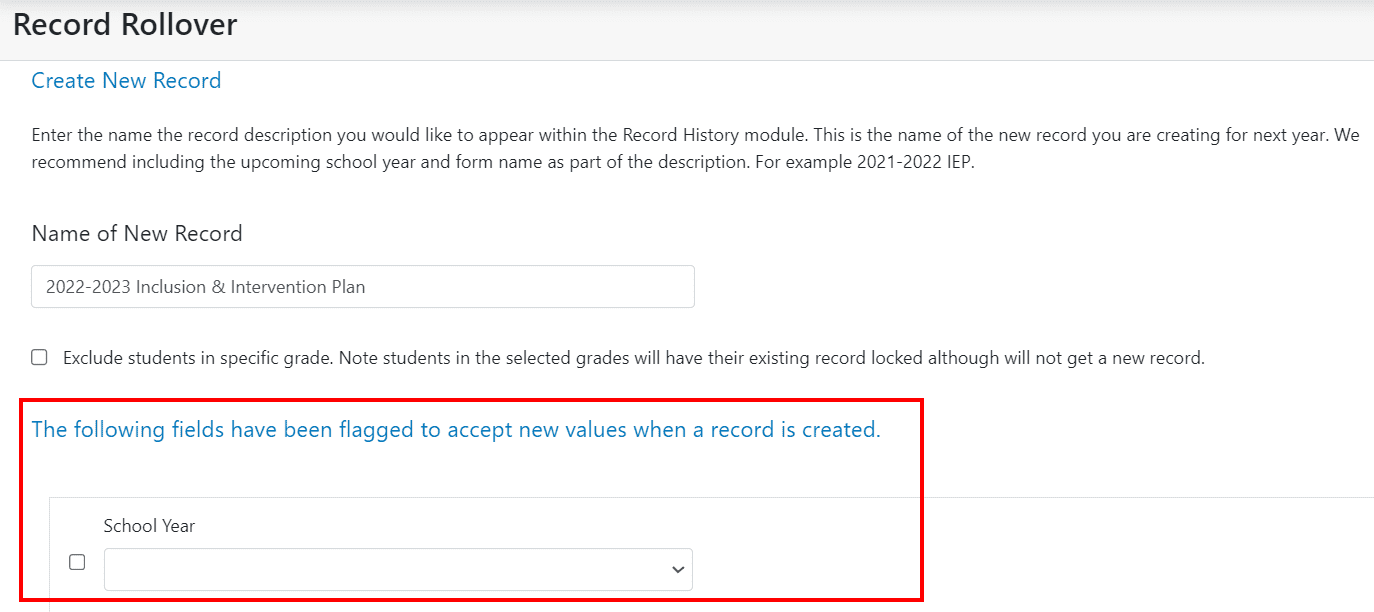
The fields that are displayed here have been flagged on the form so that they are updated during the Rollover season. The fields listed can be updated with the data that you wish to see on the newly created record.
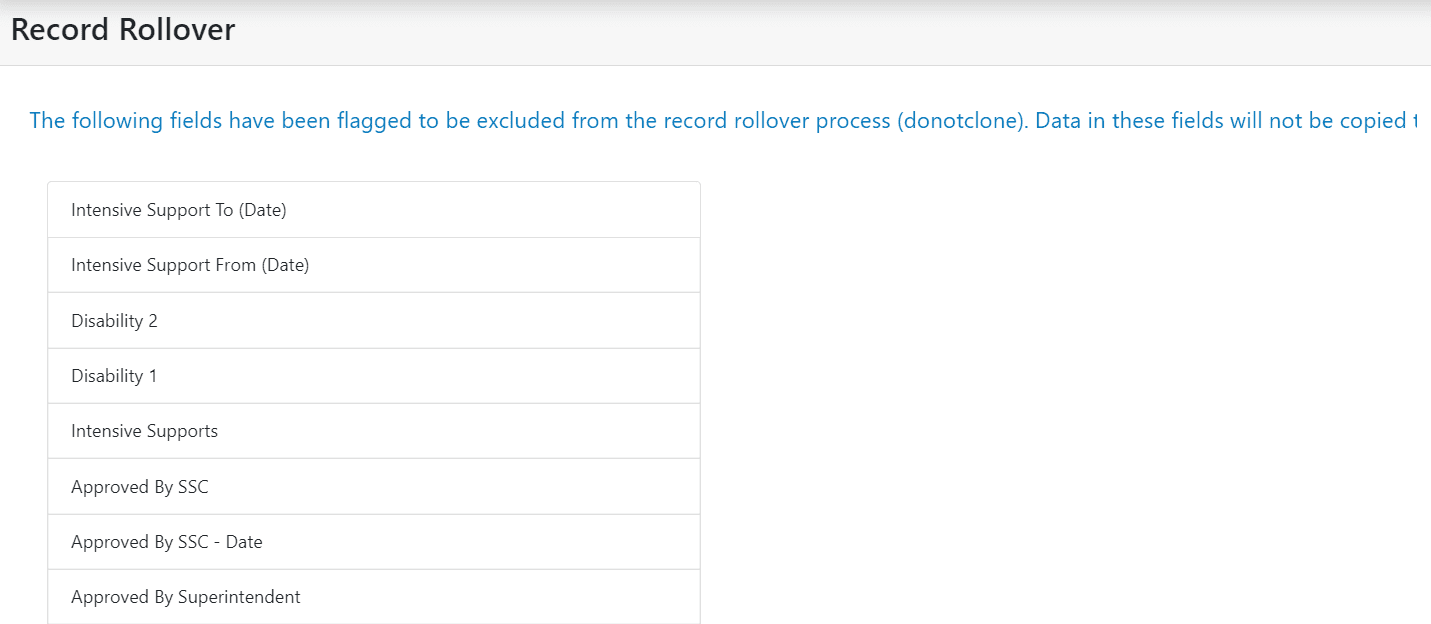
You may have fields on your form that have been flagged for exclusion on the cloned record. These fields will be listed under the header titled: The Following fields have been flagged to be excluded from the record rollover process (donotclone). The data that is in the fields for the current year’s record will not be copied over to the cloned record. This will result in a “blank” field on the newly cloned record.
Step 5: Confirming Rollover Details
The Summary Screen that displays on the Record Rollover Wizard will provide details about the rollover prior to processing the request. It is suggested that the information displayed here is reviewed thoroughly to ensure the form that was selected is rolled over correctly.
On the Summary Screen you will be able to identify the form that is being archived, the location(s) that are affected, rollover type, record description name, the fields that will be updated and fields that will be excluded.
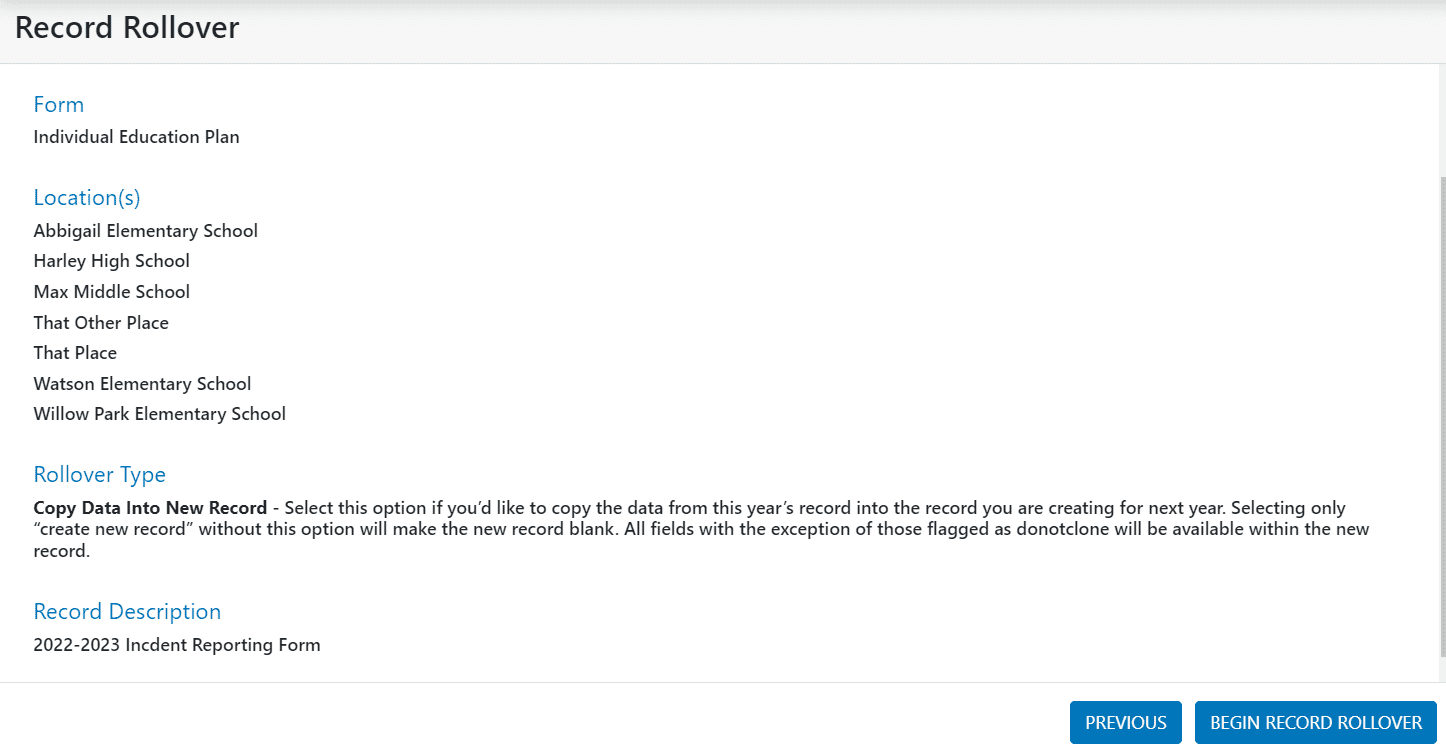
After you have reviewed the summary screen and are satisfied with what has been configured, click the Begin Record Rollover button.
Step 6: Performing the Rollover
Immediately after selecting the Begin Record Rollover button on the Summary Screen, clevr will begin archiving the records for the form that was selected. Whether you have selected one location or multiple locations, the Rollover Wizard will display its progress, first preparing the records for rollover and then archiving the records.
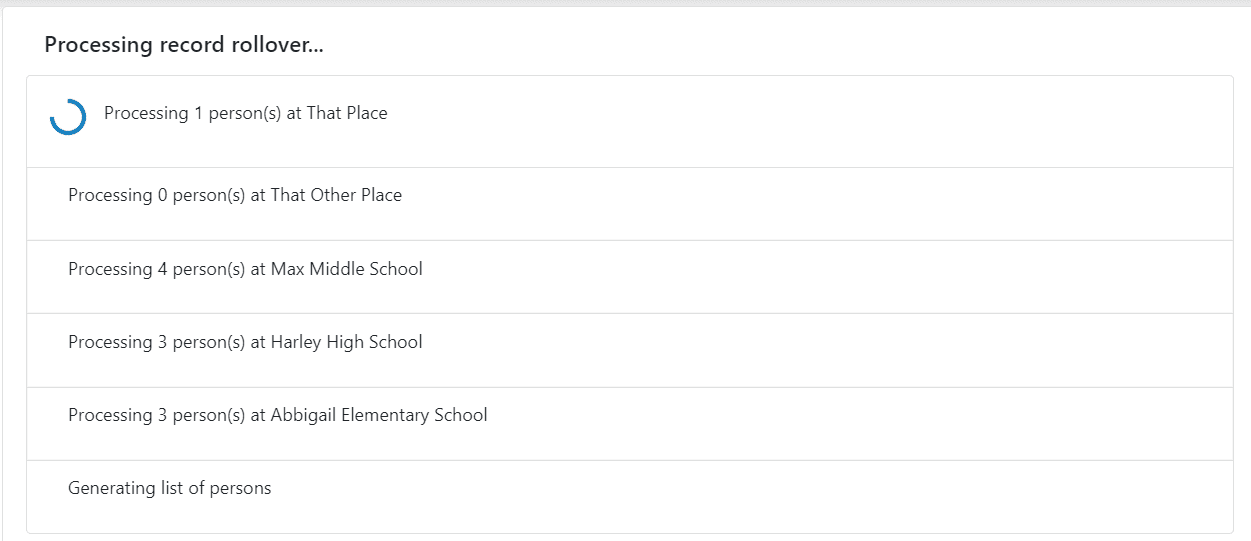
The Record Rollover Wizard will confirm that the rollover was completed as well as the records that were affected.
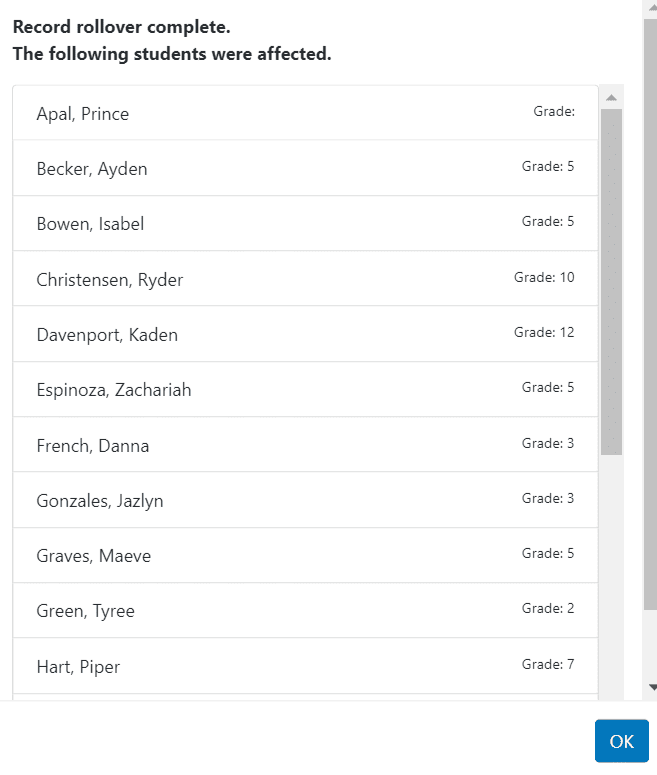

After clicking the OK button in this window, you will return to the Record Rollover Wizard Introductory screen which will display a summary of the rollover under the Record Rollover Summary.
Viewing Details for Past Rollovers
On the first page of the Record Rollover Wizard at the bottom you will find the Record Rollover Summary that lists the details of your past Record Rollovers including:
-
Form Name – The form that was archived during the rollover
-
Last Rollover – The date the rollover occurred
-
Location(s) Selected – The locations included in the record rollover
-
# of Records – The total number of records processed by the record rollover
-
Performed by – The clevr user that performed the rollover
-
View Details – Clicking this button will open a pop up window where you can see:
-
The list of locations where the rollover was performed
-
The record description selected
-
Which fields were bulk updated with the rollover
-
A list of all records that were impacted
-
The ability to undo a rollover
-
Click the View Details button to see details of past rollovers.
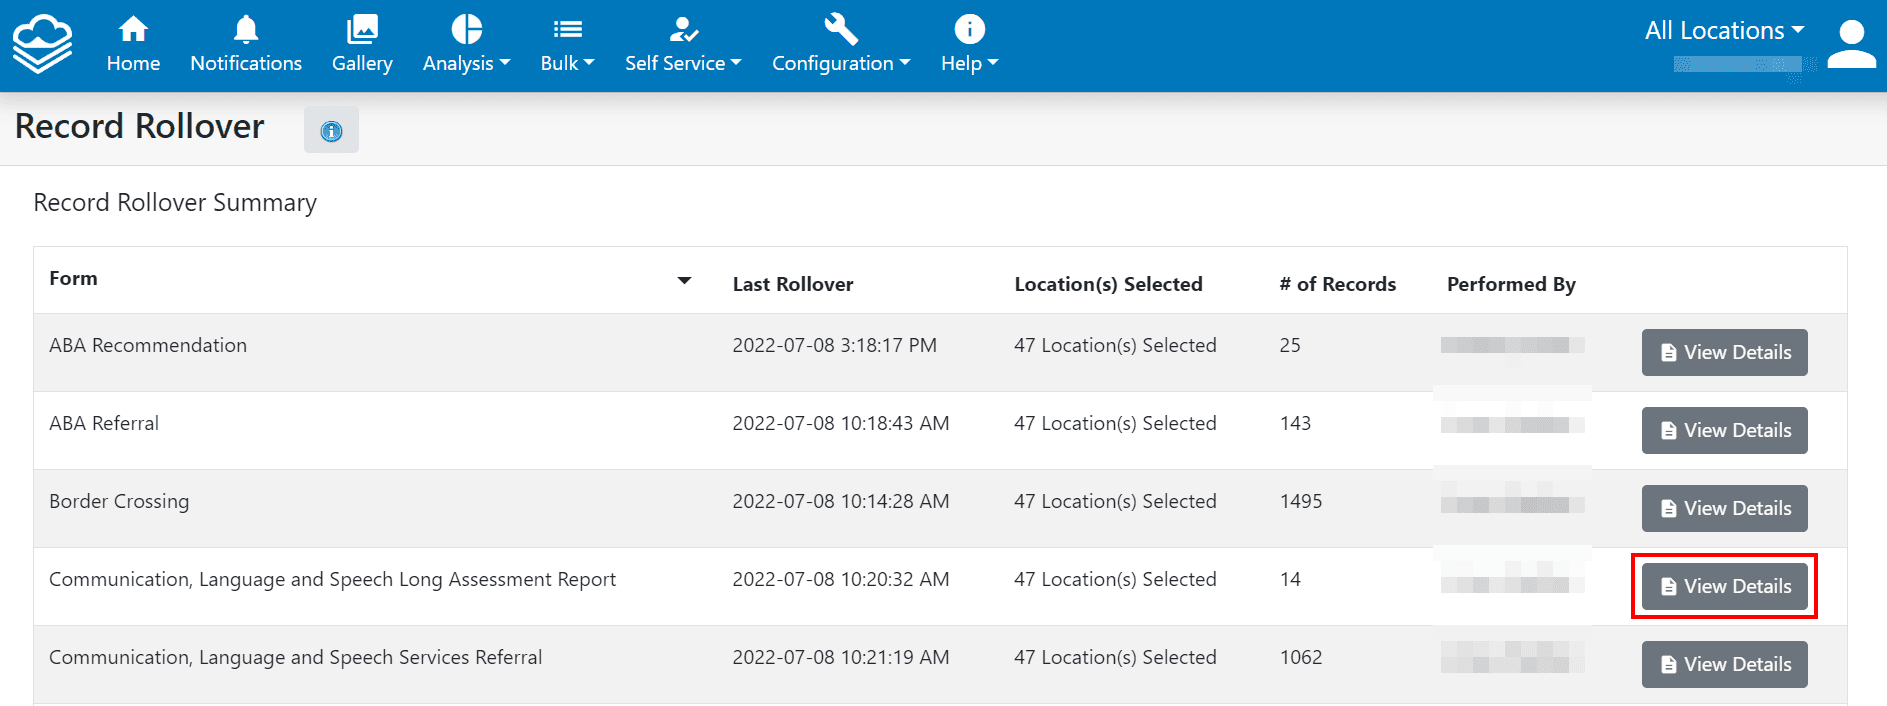
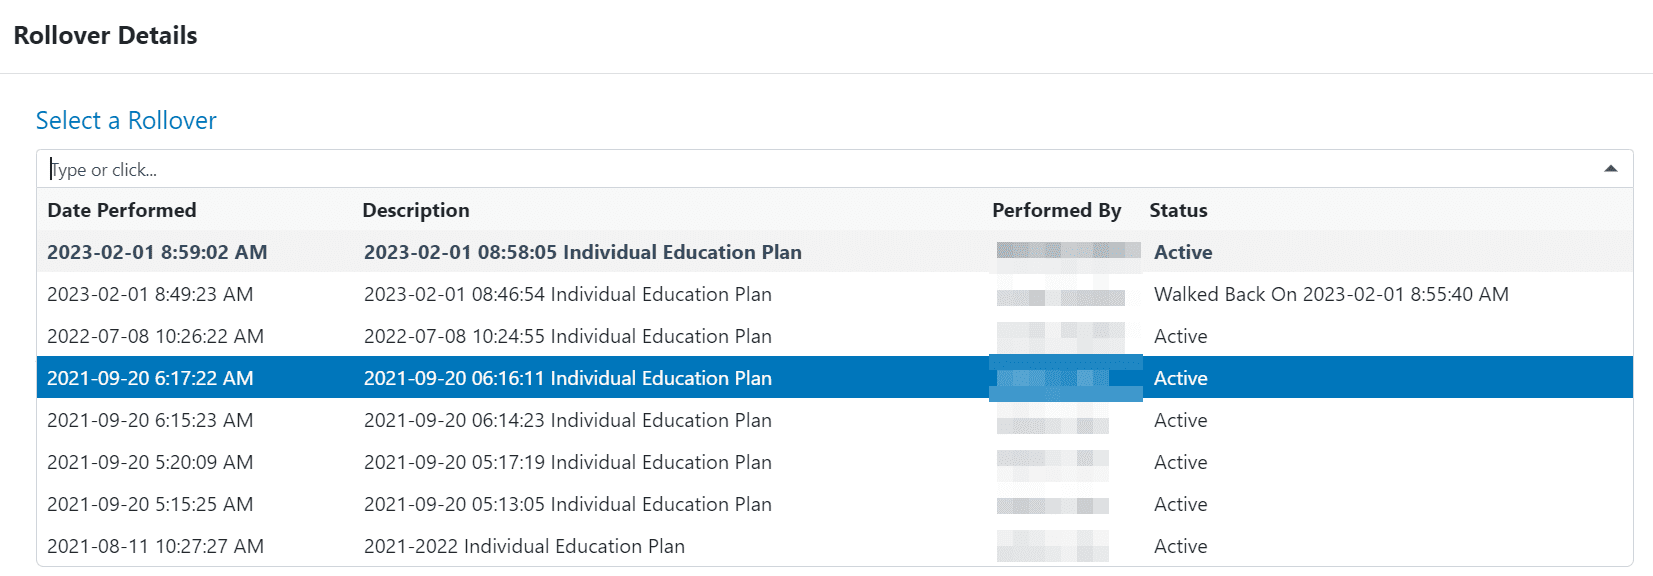
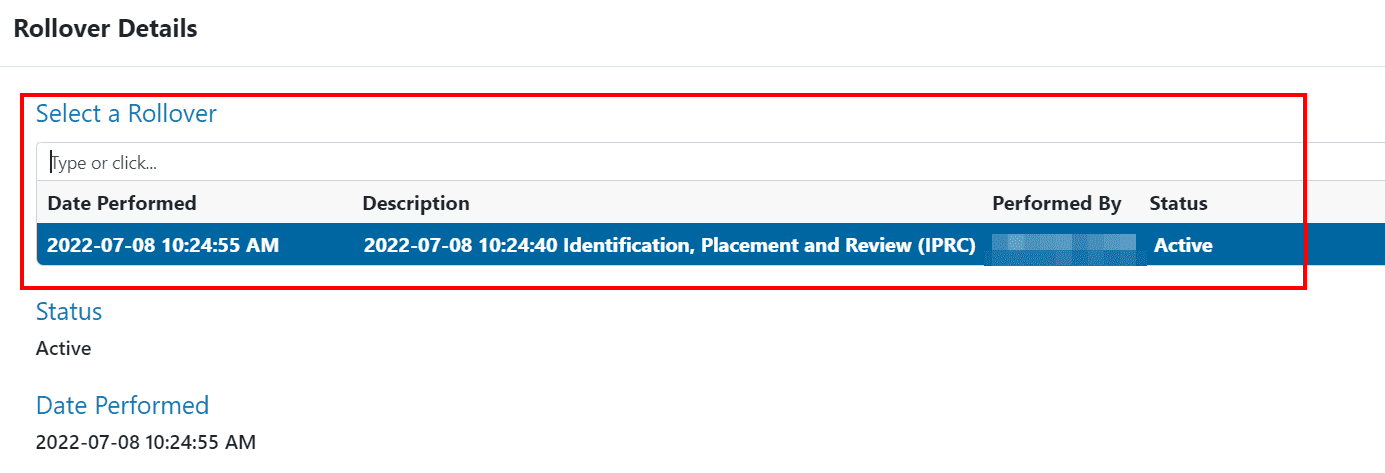
Within the View Details page, select the rollover you wish to view the details of within the Select a Rollover dropdown. The dropdown will list these values to help you determine which option to select:
-
Date Performed – The date the Record Rollover was performed
-
Description – The description selected to appear within the record history for the records created by the rollover
-
Performed By – Name of the user who performed the Record Rollover
-
Status – The status of the record rollover. The options include:
-
Active – If a rollover has not been undone the status will be Active
-
Walked Back – If a rollover was undone, it’s status will be set to Walked Back and will list the date the rollover was undone
-
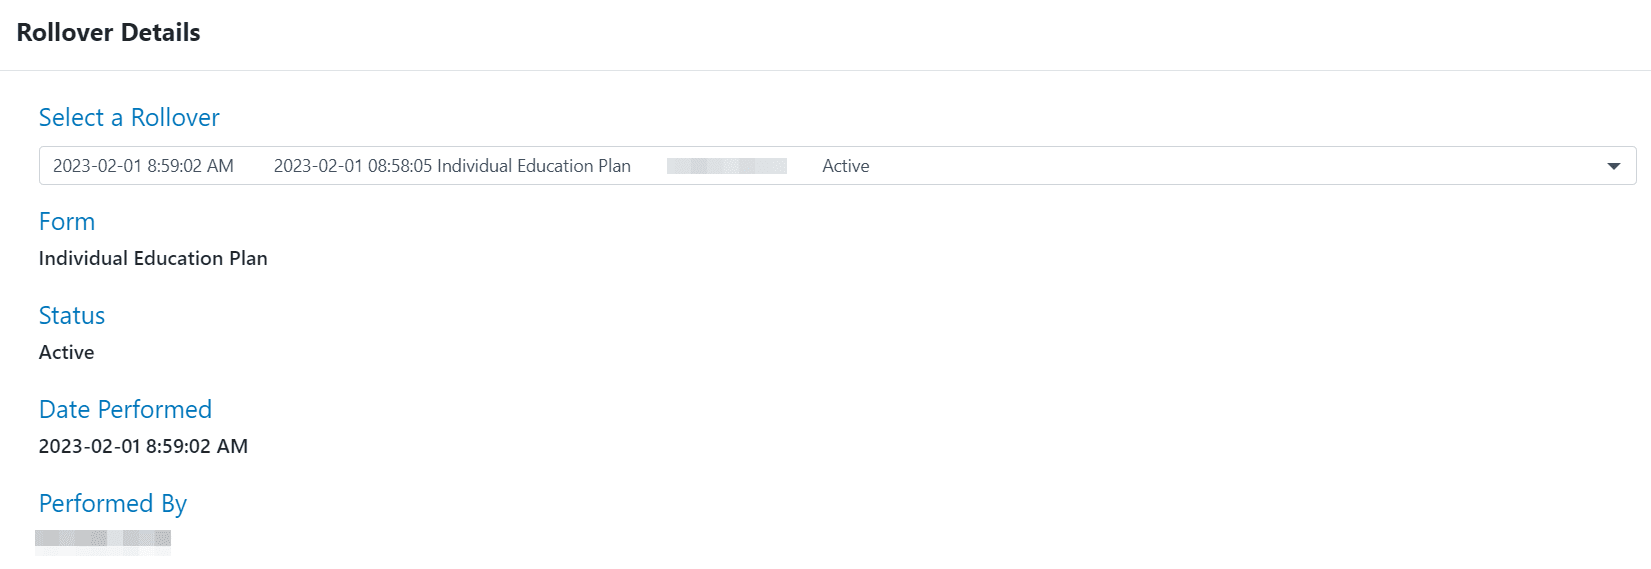
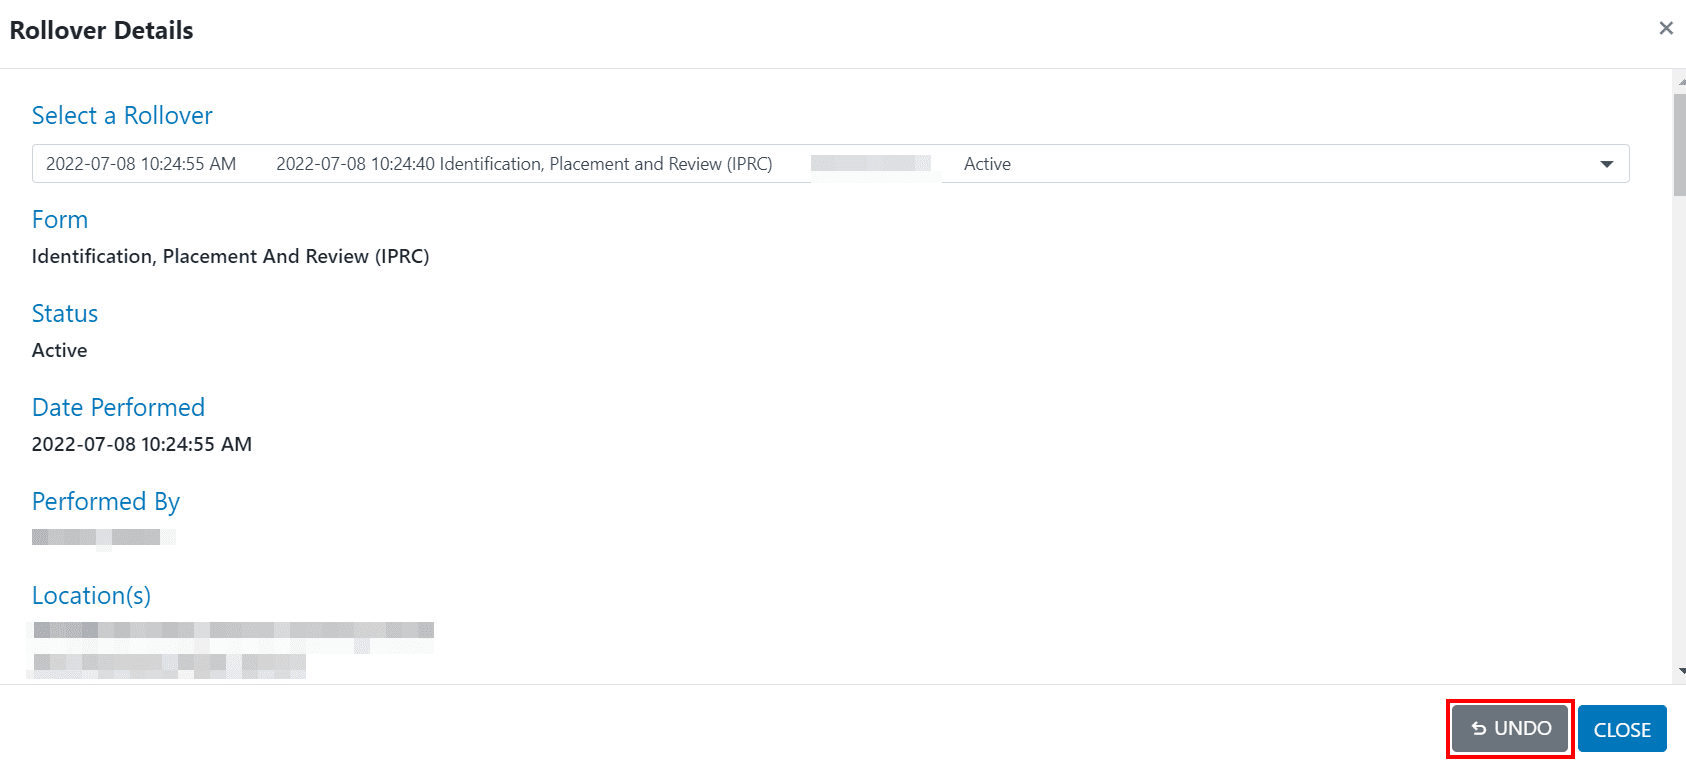
The Rollover Details page will include important information about the rollover:
-
Form – Name of the form that was rolled over
-
Status – The status of the record rollover. The options include:
-
Active – If a rollover has not been undone the status will be Active
-
Walked Back – If a rollover was undone, it’s status will be set to Walked Back and will list the date the rollover was undone
-
-
Date Performed – The date the Record Rollover was performed
-
Performed By – Name of the user who performed the Record Rollover
-
Location(s) – A list of location(s) that were rolled over
-
Rollover Type – The type of rollover that was selected. The options include:
-
Include in Rollover – Default is bulk lock existing records – Will add the form to the Record Rollover Wizard so that it can be processed for archiving. Selecting this option will default to Locking of Existing Records.
-
Create New Record in Record Rollover – This option will add the form to the Record Rollover Wizard so that it can be processed for archiving. This will lock all existing records for the current school year and create a new blank record for the upcoming year.
-
Copy Existing Data to the New Record in Record Rollover – This option will add the form to the Record Rollover Wizard so that it can be processed for archiving. This will lock the previous year’s record and create a cloned record which mirrors the previous year.
-
-
Description – The description selected to appear within the record history for the records created by the rollover
-
Fields to Update – A list of the fields that were updated in bulk in the new or cloned records when the rollover was performed
-
Records Updated – A table that lists all records that were included in the rollover process. Fields will include:
-
Name – The name of the persons who were rolled over
-
Proprietary ID – The proprietary ID number of the persons who were rolled over
-
Local ID – The local ID number of the persons who were rolled over
-
Role – The role of the persons who were rolled over
-
Action – Whether or not the record status was set to active or locked during the rollover process. If a new or clone style rollover was selected, you will see two or more entries for each person – one entry for the current record that was locked, and another entry when the new or cloned record was created.
-
Record ID – The unique ID number associated with the record that was processed during the Record Rollover.
-

Undoing a Record Rollover
A record rollover can be undone within the Record Rollover Summary page.
Navigate to the form that you’d like to undo the Record Rollover for and select View Details:

Within the Rollover Details page, select the rollover you’d like to undo in the Select a Rollover dropdown:
At the bottom of the Rollover Details page, click on the Undo button to walk back the Record Rollover:
Record Rollover Wizard – Tutorial Video
Record Rollover Prep Guide Documentation
Please see our Record Rollover Prep Guide documentation here: Record Rollover Prep Guide
