WHAT IS CLEVR
clevr™ is a cloud-based electronic forms and workflow solution that enables educators as well as parents / legal guardians to complete school forms with ease, and facilitate instant communication. clevr is a real-time environment with a robust set of tools to help educators and parents stay informed and connected during the education process.
Highlights
-
Role-Based Dashboards
-
Notifications and Alerts
-
Electronic Signatures
-
Submit Forms Online
NOTIFICATIONS OVERVIEW
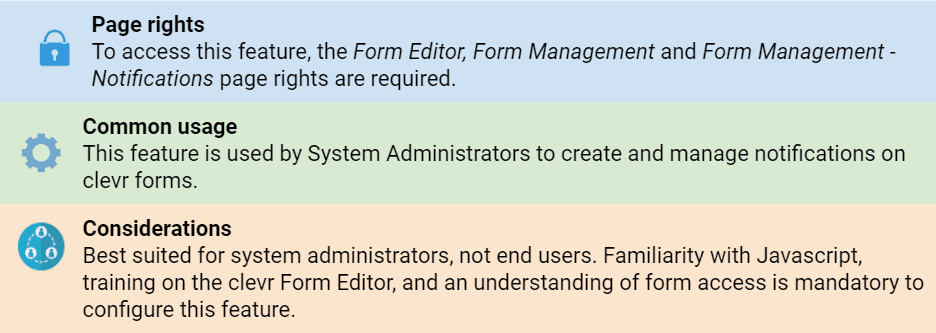
A Notification is a workflow item that is setup on a form. This deploys an email to a specific user and/or role when the notification on the form is triggered. The Notifications Card in the Form Manager is used to configure notifications.
Common usages for notifications include:
-
Notifying a user that a record requires their attention or approval
-
Updating a user on the status of a record
-
Providing information to another user about a record
Notifications are configured in two separate locations: using the clevr Form Editor to add Javascript to call specific functions and in the Form Management module to create the notification on the clevr server. This document will walk you through both components.
TYPES OF NOTIFICATIONS
There are three categories that notifications generally fall under:
-
User-Based Notifications – These are notifications that go to statically defined users. This type of notification is often used to send notifications to a specific person within your organization. These can include shared email addresses for departments, superintendents, or specific support or third-party staff.
-
Role-Based Notifications – These are notifications that will go to any user that matches the role and location criteria specified. These can include sending notifications to all school administrators, all medical staff in a role, or any other role defined in clevr. Multiple roles can be set up to receive the same notification; however only users at a single location can receive a notification at a time, as defined by the location dropdown on the form.
-
Specialized Notifications – These are notifications that use the override feature to send notifications to a record specific person. These can include the subject of the form, the submitter of an earlier notification, the user that digitally signs the form, or can even be used to notify a staff member’s supervisor*. There are effectively limitless ways of implementing a notification using an override, but setting up these notifications requires advanced knowledge of Javascript.
*Submitting a text file that outlines staff supervisor alignments is required for Supervisor notifications
TRIGGERING NOTIFICATIONS ON A FORM
OVERVIEW
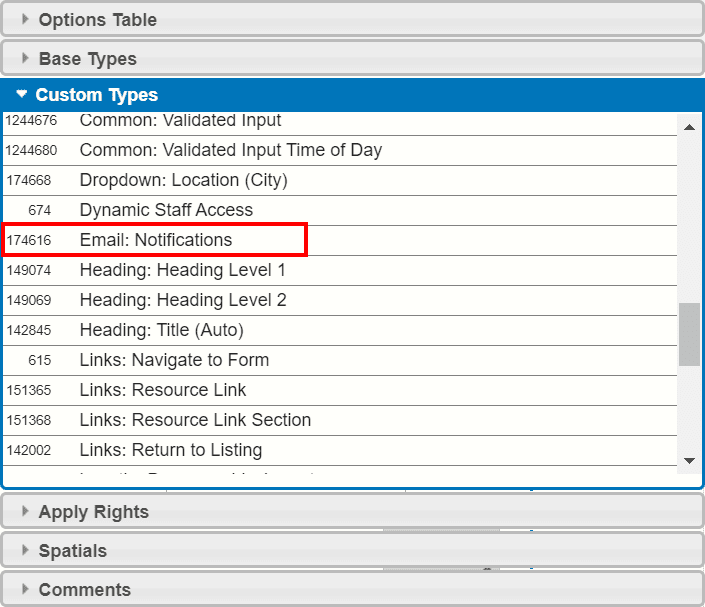
Triggering notifications on a form is performed using Javascript functions provided by the clevr platform. Most often, the function is placed in the onclick attribute of a button. To provide a standard notification layout for your users, you can use the Email: Notifications Custom Type, available in the clevr Form Editor.
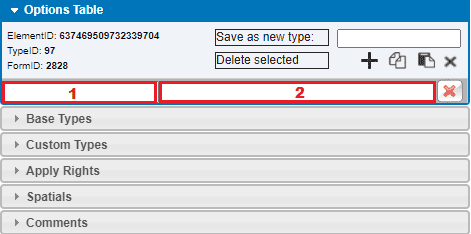
In the following documentation, examples of Javascript will be provided to implement the notification in the clevr Form Editor. An attribute and a value will be provided to input into the Options Table. The attribute should be placed in the first column (1), and the value should be placed in the second column (2).
Please make sure to hit enter after updating the value, as that applies the changes to the element. You should see a border appear around the value input after hitting enter, indicating that the update was applied successfully.
Below is an example of how code samples will be provided:

SendNotification({initiativeId}, 'Submit IEP to John Doe', $("#school").val() );
$('[elementid=123456789]').updateDate();
BEST PRACTICES
The following best practices have been created to provide the best experience for the users of your forms. Deviation from these guidelines can result in user error, unsent notifications, too many notifications, or security issues, or issues auditing a record when support is required.
-
Sending a notification on a form is an immediate and undoable event. Because of this, the action that triggers a notification should be obvious and unbundled from other actions. Where possible, restrict notifications to being sent from the Send Notification button in the Email: Notifications Custom Type.
-
For the purposes of support, debugging, and providing a visual indicator of sending a notification, it’s best practice to have a related datepicker that’s updated with the date the notification was sent. This can be done using the following code after the notification function: $(‘[elementid=123456789]’).updateDate(); .
-
If a notification requires information from other elements to function correctly, you need to use conditional code to restrict if the notification is sent and the date is updated. If the required information is not available, you should also provide meaningful feedback to the user so they understand how to correct the issue. For example, with role based notifications, selecting a school in the school dropdown of the form is required. If this field is blank, the user should receive a prompt requesting for them to select a school before deploying the notification.
This can be accomplished using a Javascript similar to the below example:
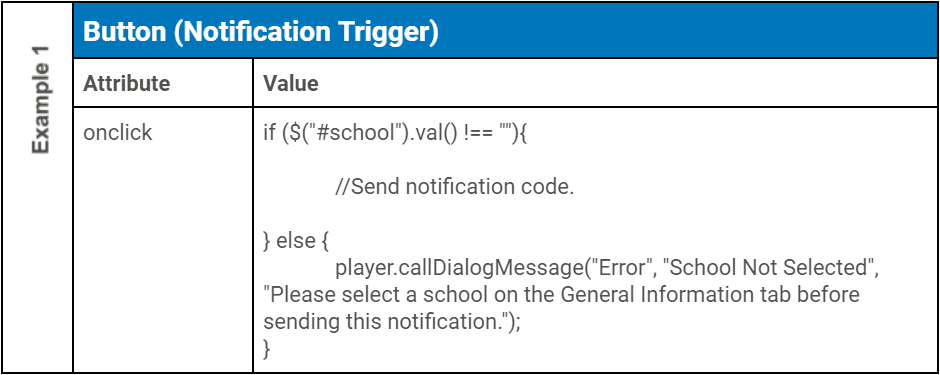
if ($("#school").val() !== ""){


//Send notification code.

} else {
	player.callDialogMessage("Error", "School Not Selected", "Please select a school on the General Information tab before sending this notification.");
}
-
In the code above, if ($(“#school”).val() !== “”) checks if the element with Id “school” is not equal to blank ( “” ). Everything in the {} after else is executed if the school element is blank.
-
Since a notification often occurs at the end of a workflow, the triggering of a notification is a logical place to enforce workflow requirements such as 100% completion of a form or the digital signing of a form. To set up these types of workflows, you will require more advanced Javascript knowledge. Please refer to your editor training documentation for all of the javascript functions available to you to support these workflows.
USER-BASED NOTIFICATIONS
To trigger a notification that isn’t role-based, you should use the SendNotification function. The function accepts four parameters, with the last two parameters being optional.
SendNotification( formId, “Notification Name”, “Location Name”, userId Override );
Parameter Definitions:
-
formId (required): This parameter tells the system which form is sending the notification. It must match the formId of the form that triggers it, or it will not be processed properly. This parameter can be set to {initiativeId} to have clevr automatically populate the formId.
-
Notification Name (required): This parameter is the full name of the notification as defined in the Form Management module. If the provided name doesn’t match the intended notification, it will not trigger. Notification names must be both:
-
Unique across the entire system
-
Informative and related to the message sent. The notification name will be displayed in the Notification Board.
-
-
Location Name (optional): While this parameter is optional, it is best practice to always include it. Any notification that includes the location in the subject or body of the email must have this value provided. The location name should be provided as a full name of a location within the clevr system. The most common way of providing this information is to put an id on the location dropdown on the form and using Javascript similar to $(“#id”).val() .
If the location dropdown on the form isn’t on the first tab of the form, the role-based notification can be used instead. The primary difference between the two functions is that the role-based function will query the server if the tab with the location dropdown hasn’t been loaded yet.
-
userId Override (optional): This is an optional parameter that will override the recipient (both user and role based). The use of this parameter is covered in more detail in the “Specialized Notifications” section below.
A few examples of Javascript to send a notification using this method:
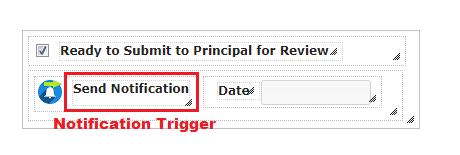

SendNotification({initiativeId}, 'Submit IEP to John Doe', $("#school").val() );
$('[elementid=123456789]').updateDate();

if ($("#submitTo").val() !== ""){
SendNotification({initiativeId}, 'Submit Incident to ' + $("#submitTo").val(), $("#location").val() ); $('.notificationDate').updateDate();
} else {
	player.callDialogMessage("Error", "Person Not Selected", "Please select a person to submit the report to in the dropdown above.");
}
ROLE-BASED NOTIFICATIONS
To trigger a notification that is either role-based or a combination of role-based and user-based, you should use the NotificationButtonSpecificLoc function. The function accepts 4 parameters, with all of them being required for the notification to be sent.
NotificationButtonSpecificLoc(formId, “Notification Name”, ‘elementId of the location dropdown’, ‘id of the notification button’);
Parameter Definitions:
-
formId (required): This parameter tells the system which form is sending the notification. It must match the formId of the form that triggers it, or it will not be processed properly. This parameter can be set to {initiativeId} to have clevr automatically populate the formId.
-
Notification Name (required): This parameter is the full name of the notification as defined in the Form Management module. If the provided name doesn’t match the intended notification, it will not trigger. Notification names must be both:
-
Unique across the entire system.
-
Informative and related to the message sent. The name is displayed in the notification board.
-
-
Location elementId(required): This is the elementId of the Location dropdown. Including this parameter is required because a role-based notification doesn’t function without a location selected. If the element can not be found on the page, due to being located on an unopened tab, the function will query the server for its value. This resilience makes this function very useful if the location dropdown isn’t located on the first tab.
-
Button id (required): This parameter is the id attribute of the “Send Notification” button. This is used to identify the button so that it can be disabled as the notification sends, preventing multiple sends from occurring as the server processes the request.
An few examples of Javascript to send a notification using this method:


NotificationButtonSpecificLoc({initiativeId}, 'Notify Principal of Request for Support', '637491477486661664', 'SubmitToPrincipal');
$('[elementid=123456789]').updateDate();
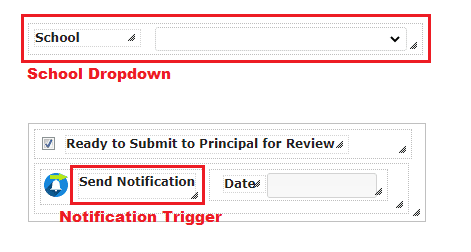
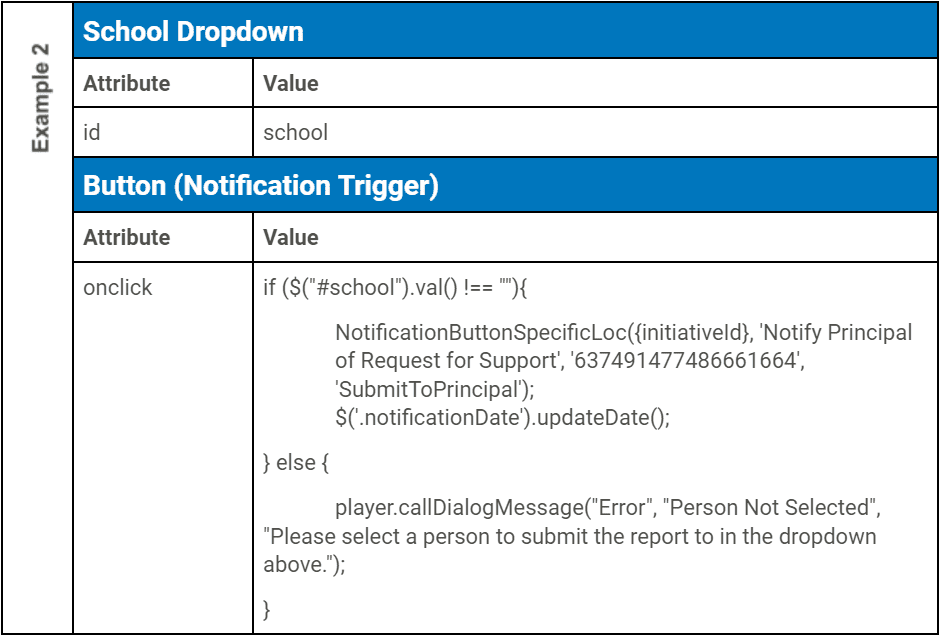
if ($("#school").val() !== ""){
NotificationButtonSpecificLoc({initiativeId}, 'Notify Principal of Request for Support', '637491477486661664', 'SubmitToPrincipal');
$('.notificationDate').updateDate();
} else {
	player.callDialogMessage("Error", "Person Not Selected", "Please select a person to submit the report to in the dropdown above.");
}
SPECIALIZED NOTIFICATIONS
Specialized notifications can be used to provide more complex and dynamic workflows. Use of these notifications require more advanced knowledge of both Javascript and the data structures within clevr.
Most of the specialized workflows utilize the userId Override parameter of the SendNotification function (details of that parameter can be found above in the “User-Based Notifications” section). This feature allows you to use Javascript to dynamically assign a personId to receive the notification.
Please note that the same restrictions listed in the “Setting up a notification in the Forms Management Module” apply here.
SERVER SUPPLIED VARIABLES
The clevr platform provides the option of using server supplied variables in all attributes. These are denoted by specific names surrounded by { }. When used within an attribute, the platform will replace those variables with the values associated with the current record. Many of these variables exist, however the following variables will be most often used when working with notifications:
{initiativeId} : This variable will be replaced with the current formId (also known as the initiativeId).
{personId} : This variable will be replaced with the personId of the subject of the form.
{userId} : This variable will be replaced with the personId of the logged in user.
If the variable isn’t being properly rewritten, the most likely issue is that there should be no spaces or line breaks within the brackets.
SUBJECT OF FORM NOTIFICATIONS
A “Subject of Form” notification is sent to the user that the form is about. It is the most simple of the specialized notifications to trigger.
Utilizing the {personId} Server Supplied Variable as the personId Override, we can configure the SendNotification function to always trigger the notification to send to the subject of the form.
An example of Javascript to send a notification using this method:


SendNotification( {initiativeId}, 'Notify Staff of Report Completion', $("#school").val(), {personId} );
$('[elementid=123456789]').updateDate();
REPLY-BASED NOTIFICATIONS
A “Reply” notification works similarly to a “Subject of Form” notification, except instead of using the {personId} Server Supplied Variable, it uses a personId stored within a hidden textbox.
We use deliberate and clear actions within a form’s workflow to identify someone as the appropriate recipient of a “Reply” notification, which can include:
-
Sending an earlier notification in the workflow (hence the name “Reply”).
-
Using a digital signature to sign the form.
-
In more advanced workflows, performing an action or clicking a button that locks or disables a section of the form.
The following are examples of incidental actions that aren’t appropriate to use to identify someone:
-
The first user to open a record.
-
The latest user to open a record (because that will be the user sending the notification).
-
The user that last modified an element, when it isn’t obvious that performing that action will result in being the recipient within the workflow.
Once you have decide how you will identify the user within the workflow, you will use coding similar to the example below to update a textbox with the current user’s person Id:
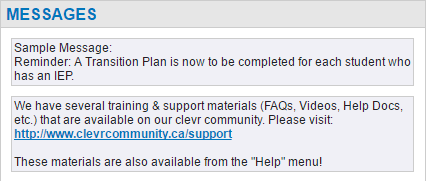
It should be noted that signatures are natively designed to store the user’s Id in the hidden textbox in the custom type. This textbox can be assigned an id and used without any further setup.
A good practice with “Reply” notifications is to also record the current user’s full name when storing their personId. This will allow the person sending the “Reply” to know who will be receiving the notification, as well as assist clevr Support in diagnosing any notification issues that may arise.
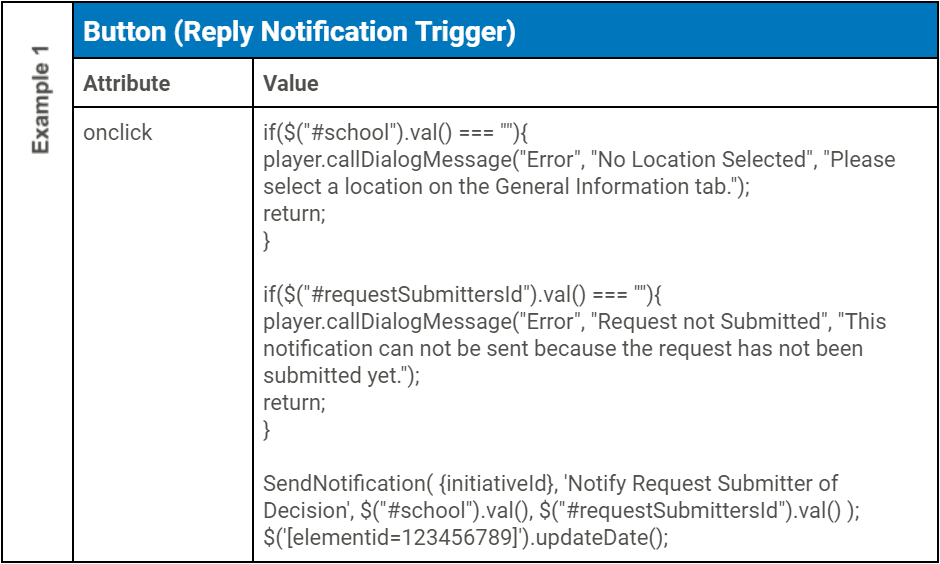
Once the first step of the reply notification is set up, you can use the value stored in the textbox to assign that user as the recipient of a later notification. To set this up, you will use code similar to the below example:

if($("#school").val() === ""){
player.callDialogMessage("Error", "No Location Selected", "Please select a location on the General Information tab.");
return;
}

if($("#requestSubmittersId").val() === ""){
player.callDialogMessage("Error", "Request not Submitted", "This notification can not be sent because the request has not been submitted yet.");
return;
}

SendNotification( {initiativeId}, 'Notify Request Submitter of Decision', $("#school").val(), $("#requestSubmittersId").val() );
$('[elementid=123456789]').updateDate();
For more information about the structure of the above code, the conditional “if” statements are using a programming pattern called a “Clause Guard”. Conditional branching is also appropriate, so use the pattern that you are most comfortable with.
AUTOCOMPLETE-BASED NOTIFICATIONS
An Autocomplete-based notification works similarly to a “Subject of Form” notification, except instead of using the {personId} Server Supplied Variable, it uses a personId stored within a hidden textbox. The hidden textbox is populated by a specialized type of autocomplete that is able to fetch and store the selected person’s personId.
Due to the complex nature of this type of notifications, setting up an Autocomplete-based notification is restricted to clevr staff only. Please contact support to inquire about adding this type of notification to your forms.
MULTIPLE MESSAGE NOTIFICATIONS
Some workflows will require that different notifications are sent to different recipients with the same action. It is possible to combine the notification types listed above to trigger multiple notifications to multiple people. Please note that for each notification trigger, the processing time will increase, so it is suggested that you only trigger 2 to 3 notifications at a time.
A common use case for sending multiple notifications would be to send a different message to a supervisor and the subject of the form at the same time. This can be accomplished using code similar to the example below:


SendNotification( {initiativeId}, 'Notify HR of Decision', $("#school").val() );
SendNotification( {initiativeId}, 'Notify Staff of Decision', $("#school").val(), {personId} );
$('[elementid=123456789]').updateDate();
REPEATER-BASED NOTIFICATIONS
Repeater-based Notifications are notifications where the elements that contain identifying data, such as location or person override, are located within a repeater and iterated over when the notification is triggered.
Due to the complex nature of this type of notifications, setting up an Repeater-based notification is restricted to clevr staff only. Please contact support to inquire about adding this type of notification to your forms.
NOTIFICATION SENT MODALS
Some user groups will benefit from having a modal (popup) appear after clicking Send Notification. This will provide more feedback for users that aren’t noticing the Date field update and clicking Send Notification multiple times. It can also be useful to provide extra information following sending the notification. Please note that important instructions shouldn’t solely exist within the modal message, as there would be no way of seeing the message again without re-sending the notification.
The addition of a static modal can be performed by adding a simple line of Javascript at the end of your notification code, see example below:

SendNotification( {initiativeId}, 'Send review request to School Admin', $("#school").val() );
$('[elementid=123456789]').updateDate();
player.callDialogMessage("Success", "Request Sent", "The request has been sent to the school admin, please allow 2 weeks for a reply.");
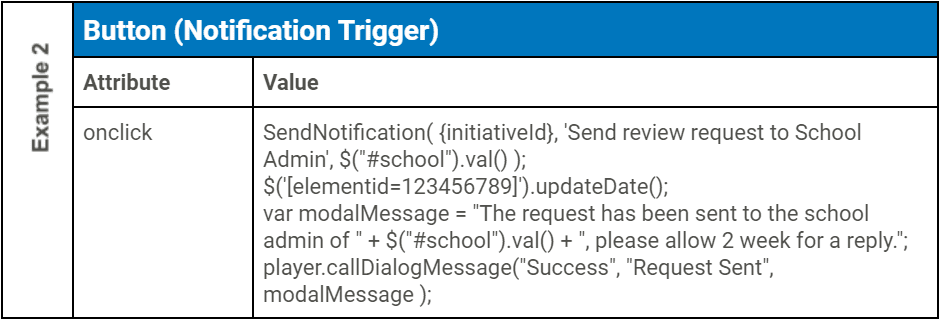
To include a more complex data, driven by the value of elements on the form, you will have to use Javascript to get those values, and combine them with the static parts of the message using Javascript. See example below:
SendNotification( {initiativeId}, 'Send review request to School Admin', $("#school").val() );
$('[elementid=123456789]').updateDate();
var modalMessage = "The request has been sent to the school admin of " + $("#school").val() + ", please allow 2 week for a reply.";
player.callDialogMessage("Success", "Request Sent", modalMessage );
DEPRECIATED NOTIFICATIONS
CHECKBOX NOTIFICATIONS
To send a notification when a checkbox is checked, you can use a Checkbox Notification function.
Checkbox Notifications have been depreciated and their use is considered against best practice for the following reasons:
-
Without extensive labeling, it might not be obvious to the user that checking a notification will trigger a notification. This can cause notifications to be sent in error, as normally an action the user takes with a checkbox is reversible, where a notification is not.
-
A checkbox can be unchecked, which depending on the design of the form, can give the appearance that the notification has not been sent.
-
If the checkbox doesn’t have a description (which gets used as the message for the confirmation modal), the notification will be sent without a confirmation. Because of the undoable nature of notifications, it is best to design a form to make sure that a single erroneous action can’t trigger a notification. This is why the current notification custom type is designed to have a “reveal” action and a “send” action. By making the sending of a notification require 2+ actions, you reduce the possibility of both mistaken notifications and possible breaches of privacy.
-
Checkbox Notifications do not have the ability to utilize the override feature of User-based notifications. Retrofitting a Checkbox Notification into a button based notification can cause loss of data, so best practice is to plan ahead and not use Checkbox Notifications when the use of an override is possible in the future.
-
Since providing the location is a requirement for Role-based notifications, Checkbox notifications are limited to situations where the location name can be accessed using javascript.
CheckBoxNotificationSubmit( $(checkbox selector) , formId, “Notification Name”, showDebug(0/1), “Location Name”, Trigger Saving of Name in Custom Type(0/1) );
Parameter Definitions:
-
$(checkbox selector): This parameter is a jquery Collection containing only the checkbox that triggers the notification. Oftentimes since this code will be found on the onChange of the checkbox itself, you can set this parameter to $(this) .
-
formId (required): This parameter tells the system which form is sending the notification. It must match the formId of the form that triggers it, or it will not be processed properly. This parameter can be set to {initiativeId} to have clevr automatically populate the formId.
-
Notification Name (required): This parameter is the full name of the notification as defined in the Form Management module. If the provided name doesn’t match the intended notification, it will not trigger. Notification names must be both:
-
Unique across the entire system
-
Informative and related to the message sent. The notification name will be displayed in the Notification Board.
-
In our other documentation, you will see this parameter provided as $(this).attr(‘notificationAction’) . This will grab the value of the attribute ‘notificationAction’ from the checkbox. However, you are able to provide the name of the notification as a string directly into the function.
-
showDebug (optional): This is an optional parameter that allows you to define if you’d like the function to log the notification name and formId provided in the console. This can be helpful in cases where you are debugging the notification. This should be left off when the form is in production. The accepted values are:
-
0 = Off
-
1 = On
-
-
Location Name (optional): While this parameter is optional, it is best practice to always include it. Any notification that includes the location in the subject or body of the email must have this value provided. The location name should be provided as a full name of a location within the clevr system. The most common way of providing this information is to put an id on the location dropdown on the form and using Javascript similar to $(“#id”).val() .
If the location dropdown on the form isn’t on the first tab of the form, the role-based notification can be used instead. The primary difference between the two functions is that the role-based function will query the server if the tab with the location dropdown hasn’t been loaded yet.
-
Trigger Saving of Name in Custom Type (optional): This is an optional parameter that will trigger the saving of the submitter’s name in a specific custom type. Unless you are specifically using the custom type that this parameter is designed for, you should leave it undefined or 0. The accepted values are:
-
0 = Off
-
1 = On
-
A few examples of Javascript to send a notification using this method:


CheckBoxNotificationSubmit($(this), {initiativeId}, $(this).attr('notificationAction'));
$('[elementid=123456789]').updateDate();

CheckBoxNotificationSubmit($(this), {initiativeId}, $(this).attr('notificationAction'), 0 , $('#location').val() );
$('[elementid=123456789]').updateDate();

CheckBoxNotificationSubmit($(this), {initiativeId}, 'Notify school admin of Incident Report');
$('[elementid=123456789]').updateDate();
VIEWING, CREATING, AND EDITING NOTIFICATIONS IN FORM MANAGEMENT

VIEWING NOTIFICATIONS FOR A FORM
Within the Form Management module, the table in the Notifications Card displays a list of notifications that are associated with the form, along with important information about each notification. A notification can only be triggered on the form that it is associated with.

The columns display the following information:
-
Notification Name – This is the name of the notification. The name is used to trigger the notification when configuring the form, and it is the name that appears for the notification within the Notification Board (as the Notification column).
-
Description – The description is a hidden field that can be used to provide information and context about the notification. It is not displayed anywhere else in clevr.
-
Users – The users column lists the email addresses of the users that will receive the notification.
-
Roles – The roles column contains a list of roles that will receive the notification, restricted by the locations listed.
-
Locations – The locations column lists the locations that users must be assigned to receive the notification if they are assigned to a role configured to receive notifications.
-
Automatic URL Login – Automatic URL Login indicates whether or not this notification utilizes a feature to include a link in the email that provides no credential access to the record where the notification was deployed. This option has significant security implications, we strongly suggest not using this feature.
ADDING NOTIFICATIONS TO A FORM
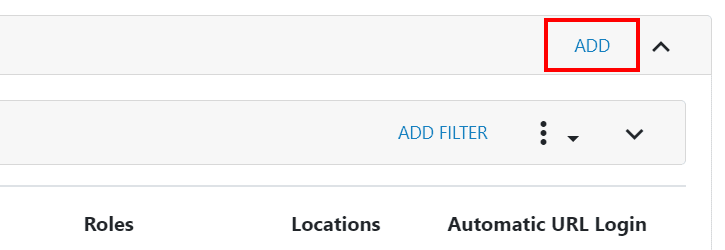
Within the Form Management module > Notification card, new notifications can be added by clicking on the Add button.
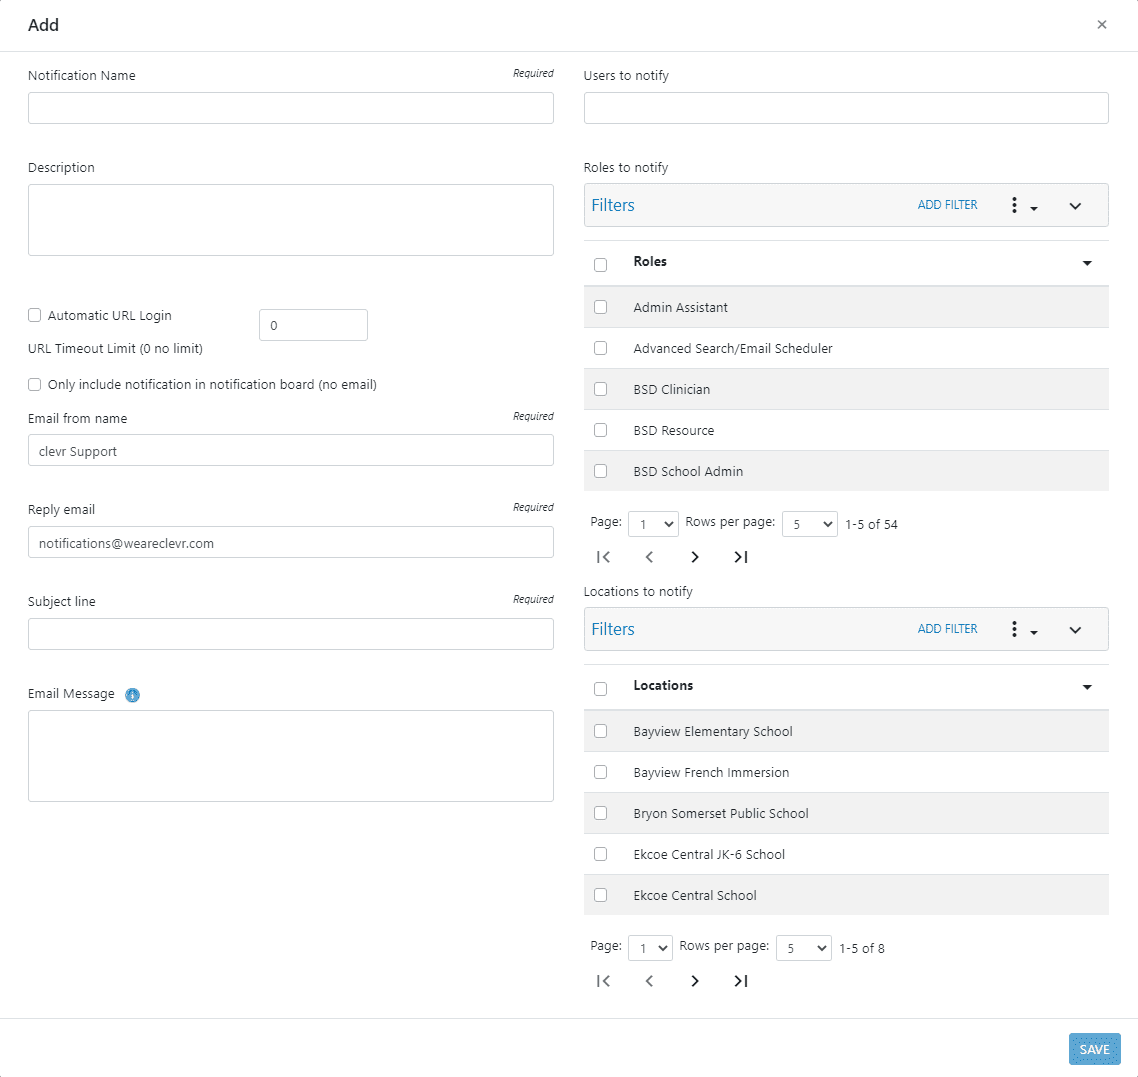
The Notification Editor will open with a blank notification. Continue to the Editing a Notification section to learn more about using the Notification Editor.
EDITING NOTIFICATIONS IN THE NOTIFICATION EDITOR
The Notification Editor contains all available settings and actions for each notification.
With the notification open, you can trigger the following actions:
-
Save/Update: The Save/Update button in the bottom right of the editor will save a new notification or update an existing notification, then close the editor. No changes will be made to the notification unless they are saved to the server, so always remember to Save/Update before closing the editor or navigating away from the Form Management module.
-
Create Copy: The Create Copy button in the top right of the editor will close the editor for the current notification without updating, and open the editor for a new notification, copying all data currently in the editor except for Notification Name.
This new notification is not created until the Save button is clicked in the bottom right of the editor. Leaving the editor before Saving will cause the copied notification to be discarded. -
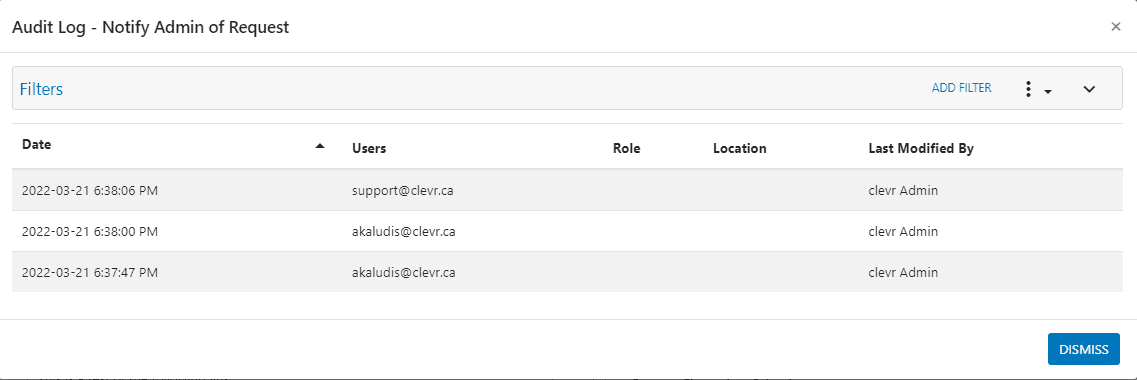
Audit Log: The Audit Log button in the top right of the editor will display the Audit Log modal for the current notification. The Audit Log will display a list of edits to notification, along with who made the changes and when the changes were made.
-
Delete: The Delete button in the top right corner of the editor will permanently delete the notification. This operation can not be undone. If a notification is deleted in error, it will have to be recreated using the same notification name.
The Notification Editor allows you to modify all options for a notification; the name used to trigger the notification, all of the content of the message, and all recipient information. You can update the following options:
-
Notification Name: This is the name of the notification. The name is used to trigger the notification when configuring the form, and it is the name that appears for the notification within the Notification Board (as the Notification column).
A notification must have a unique name across all forms. You will receive an error message if you attempt to create a new notification with a duplicate name.

-
Notification Name can not be modified after a notification has been saved. To modify the name of a notification, you must make a copy of the notification. This will allow you to create an identical notification without having to input all the options again.
-
Description: Description is a hidden field that can be used to provide information and context about the notification. It is not displayed anywhere else in clevr.
Use the description to provide information and context about when and how the notification is used. It is best practice to include notes about any specific workflow information and the location of the form that the notification is triggered. -
Automatic URL Login: Automatic URL Login indicates whether or not this notification utilizes a feature to include a link in the email that provides no credential access to the record where the notification was deployed. This option has significant security implications, we strongly suggest not using this feature.
-
Only include notification in notification board: When this option is enabled, a notification will not send an email to the recipients, instead only appearing within the Notification Board. Having this option will also hide and ignore all email options, however the option settings will be preserved and available when this option is disabled.
-
Email from name: The Email from name option is the name of the sender that is used in the notification email. This option is automatically populated with “clevr Support”, and should not be changed without prior knowledge of how it may affect email deliverability.
-
Reply email: The Reply email option is the email address of the sender that is used in the notification email. This option is automatically populated with “notifications@weareclevr.com”, and should not be changed without prior knowledge of how it may affect email deliverability.
-
Subject line: The Subject line option is the subject line of the notification email.
When specifying the subject line, you should be aware of how your organization’s email client will truncate the subject line in the inbox. Important and identifying details in the subject line should come before the cut off to prevent the appearance of multiple similar emails.
You should also consider any privacy concerns when creating a subject line, as it is possible for a user to inadvertently share the details of their inbox and create a breach of privacy.
All notification variables specified in the Email Message below are available in the Subject line. -
Email Message: The Email Message option is the body of the notification email.
Email Messages can contain all alphanumeric characters, all standard special characters, and line breaks. They can also contain notification variables, which are populated by the record that triggers the notification. The notification variables are as follows:-
{studentName} : This variable will contain the name of the subject of the form.
-
{teacherName} : This variable will contain the name of the user who triggered the notification.
-
{locationName} : This variable will contain the name of the location passed to the notification on the form. If no location name was specified in the javascript on the form, then the value will return -1. It is best practice to always pass the notification a location, to prevent the above issue.
-
{formName} : This variable will contain the name of the form.
-
{elementId123456789} : Replacing the number in the variable with the elementId of an element on the form, this will output the value of that element. Checkboxes will output either true or false. Elements within repeaters are not supported.
-
-
Users – The Users option is the list of email addresses of the users that will receive the notification. Multiple addresses can be specified in a single notification by separating them with a comma.
If a notification is only intended to be used with an override, you must specify an email address to save the notification. The best practice is to use a “catch-all” email address that you can use to identify when an override might be malfunctioning and won’t cause a breach of privacy should a notification go to that address. Please ensure that the “catch-all” email address complies with your local privacy laws. -
Roles – The roles option a list of all roles available within clevr. All users that meet the following criteria will receive a notification:
-
They are assigned one of the roles checked.
-
They are assigned to the location specified when the notification was triggered.
-
They have access to the form at the location specified when the notification was triggered.
-
If you are providing clevr with a Staff Supervisor textfile, a specialized role will appear exclusively in the Notification Editor. You will be able to specify the “Direct Supervisor” role, which will go to the supervisors of the subject of the form. When this role is used, no other roles and no locations should be selected.
-
Locations – The locations option is a list of all locations available within clevr. When a notification is sent and the location specified isn’t selected in this option, the notification will not be sent. You can click on the checkbox beside the “Locations” row to select all locations available.
DIAGNOSING NOTIFICATION ISSUES
Diagnosing notifications that are not behaving as expected can require some trial and error to identify an issue. Following the instructions below, from top to bottom, can help you identify errors in the order of most common to least common.
BEST PRACTICE
When attempting to diagnose a notification, it is a good idea to switch the notification to only include the notification in the notification board. This will prevent emails from being sent to a potential recipient.
If you are working on debugging notifications, the use of the notification board is a critical tool to test and verify notification. A successful notification will always appear in the notification board.
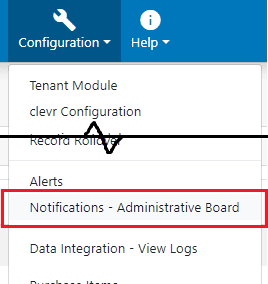
If you have the page access rights to access the Notification – Administrative Board, you can also see all notifications sent and received within clevr. This can be a useful tool for verifying reported issues with notifications.
NOTIFICATION IS NOT SENDING
-
Is the notification being triggered?
When clicked, the page should fade and a “processing” spinning should appear and rapidly disappear. -
Does the triggered notification name match the notification in Form Management?
The notification names must match. Common errors that can occur include unsupported special characters, leading or trailing spaces in the name, or simple misspellings. -
Is the notification on the correct form?
Notifications must be created on the form that will trigger it. If you attempt to trigger a notification from a different form, it will fail to send. -
Does the recipient have access rights to see the form?
If the recipient’s role doesn’t have access to view the form, they will not receive a notification.
NOTIFICATION SENT TO THE WRONG PERSON
-
Does the incorrect recipient have the same email address of the correct recipient?
If multiple users have the same e-mail address, they will both receive a notification in the notification board. However, since both recipients are using the same email address, only the intended email address will receive an email. -
Is the incorrect recipient assigned to an erroneous role or location?
If a user receives a Role-based notification in error, you should verify that they don’t match the role and location criteria of the notification. -
If the notification is going to the person’s Direct Supervisor, does the supervisor textfile contain the correct staff hierarchy?
If using a Direct Supervisor notification, please verify the data within the clevrSupvisor.txt file being provided to clevr. If the data provided is incorrect, it must be corrected before the notification will work as intended.
NOTIFICATION SENT MULTIPLE TIMES TO THE SAME PERSON
-
Are there multiple users with the same email address?
If multiple users have the same e-mail address, they will both receive a notification in the notification board. If multiple users match the criteria of the notification (email address or role/location), a notification will be sent for each user that matches the criteria. If a user has multiple linked accounts with the same email, for example, they will get an email for each account with the same email address. -
If the form is triggering multiple notifications, does a user meet the criteria of more than one of those notifications?
If multiple notifications are triggered with a single action, it is possible that a single user meets the criteria to receive more than one of those notifications. There is currently no way of excluding the recipients of one notification from receiving a different notification.
NOTIFICATION WILL NOT SAVE IN FORM MANAGEMENT
-
Does the notification name already exist on another form within clevr?
The name of a notification must be unique across your school district. The notification editor will provide the following message if you’ve attempted to create a new notification with a duplicate name.

-
Have you provided a user or role based recipient?
Every notification must have a recipient selected, whether it be a user email address or a Role-based notification. Even if the notification will only be using the override feature, you must provide a recipient. In this case, it would be best to provide the email address of a user that can act as a “catch-all”. The catch-all user should not be someone who would cause a breach of privacy, should one of the notifications be sent to them. Please make sure to follow all local privacy laws and restrictions. -
Does your notification have all the message details?
If the notification is sending an email, you must provide information for all message details. This includes reply-email, email from name, subject line, and message body. Leaving any of these fields blank will prevent the notification from being saved.
THE VALUE OF A NOTIFICATION VARIABLE ISN’T APPEARING IN THE SUBJECT OR BODY OF THE NOTIFICATION
-
Is there a space between the {} brackets of your variable name?
-
Is the variable name and/or elementId correct?
If the variable name is spelled incorrectly, it should appear in the message.
e.i. {locationMane} will appear in the message itself.
If the elementId is incorrect, the value of the variable will return blank as the system looks for a value of the incorrect elementId on the server. -
My {locationName} is being sent as “-1”.
If {locationName} is being sent as “-1”, it means that when the notification was triggered on the form, there was no value provided for the location name from the form itself. -
Is the element within a repeater?
An element included within a notification can not be within a repeater and is not supported currently.
HAVE QUESTIONS? WE’RE HERE TO HELP
BROWSE ONLINE SUPPORT
clevrcommunity.ca is a convenient place to find information about clevr features, recent updates, webinar recordings, how to submit a support ticket, and more. Check it out:
-
Help Docs
-
FAQ
-
Webinar Recordings
-
Release Notes
-
Announcements
-
Submit a Support Ticket
TALK TO A LIVE AGENT
If you prefer, you can also get in touch with us by phone at 613-966-6806. Our knowledgeable staff is technically trained and available to assist you.
