Introduction
This document will address how to restrict date pickers, how to specify the length between them in terms of days, how to prevent users from picking dates which aren’t congruent with the specified length, and how to throw errors/a warning to the user.
There are 3 main methods which may be used in conjunction, or separately in order to achieve valid dates. The first method is to simply restrict the user from picking a start date which comes after the end date, or an end date which comes before the start date. The second method is to find the difference between the two dates, check that they are in range, and throw an error message if they aren’t. The final method is to automatically update the date pickers based on the specified length desired between them, possibly in conjunction with disabling one of the two datepickers.
If using the 3rd method, it is recommended to skip straight to the “Automatically Update Datepickers” section, as it takes much greater control over the date pickers and will render most of the first two methods superfluous.
Restricting the Datepicker
The first step to properly restricting the datepickers is to create a function which will take the date from one datepicker, and use it to limit another date picker. On a container outside of the tabset add the following code to the docready attribute:

$.limitDate = function(element, date, message, period) {
  let limitDate = FCF.time.toDate(date);
  if(period == 'start') {
  limitDate = FCF.time.offsetDate(date, -1);
	FCF.restrictDatePicker(element, {start: limitDate, startMessage: message})
  } else{
	FCF.restrictDatePicker(element, {end: limitDate, endMessage: message});
  }
};

Now that the function is set up, the next step is to set up the datepickers. All that is needed to set these up is to add the id attribute with a descriptive value. The id’s used in this example are tripStartDate, and tripEndDate.
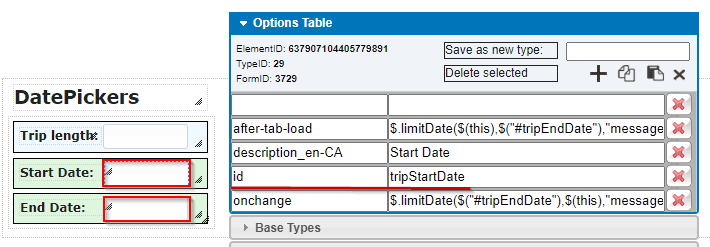
The previously made function will need to be called 4 times, once on the after-tab-load attribute of each datepicker, and once on the onchange attribute of each date picker. The function $.limitDate(element,date,message,period); utilises 4 parameters; element: the datepicker which will be restricted; date: this will be the datepicker which holds the datestring you want to restrict the element to; message: this is the message which will display to the user when they try to select a restricted date; period: this will be “start” if the date being restricted is the start date.
The following table will outline examples of this for each attribute it must be applied to. When using this on your own form, replace the “tripStartDate” and “tripEndDate” with the ids of your start and end date datepickers respectively. Make sure to keep the “#” symbol. Also be sure to replace “message” with the message you would like to have displayed when the user attempts to select a restricted date.

$.limitDate(this,"#tripEndDate","message");
$.limitDate("#tripEndDate",this,"message","start");
$.limitDate(this,"#tripStartDate","message","start");
$.limitDate("#tripStartDate",this,"message");
The start datepicker should now be restricted to only dates which come before the end date, and the end datepicker should be restricted to only dates which come after the start date.
Verify the Date Difference
The first step to verifying the number of days in the date range is equal to a specific number, and to display an error message, is to create a series of functions. For each of the following functions, create a container outside of the tabset and add the code to the docready attribute.
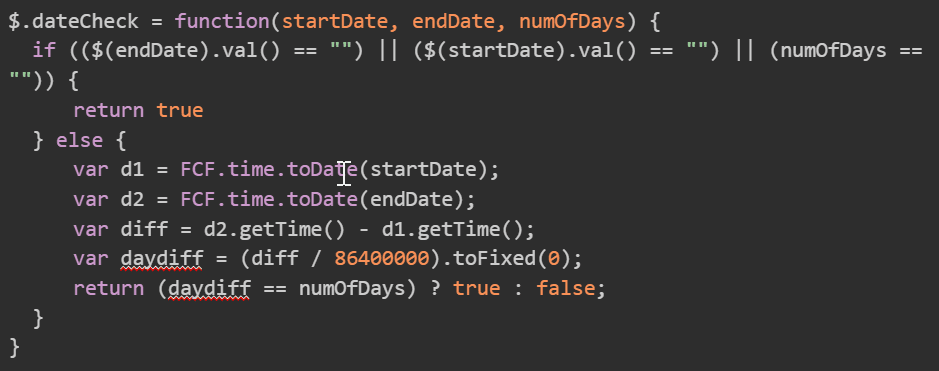
$.dateCheck = function(startDate, endDate, numOfDays) {
  if (($(endDate).val() == "") || ($(startDate).val() == "") || (numOfDays == "")) {
	return true
  } else {
	var d1 = FCF.time.toDate(startDate);
	var d2 = FCF.time.toDate(endDate);
	var diff = d2.getTime() - d1.getTime();
	var daydiff = (diff / 86400000).toFixed(0);
	return (daydiff == numOfDays) ? true : false;
  }
}

$.setErrorColour = function(elements, color) {
  $.each(elements, function(index, value) {
	$(value).css("background-color", color);
  });
};
For the following function, replace WARNING TITLE with what you would like the warning title to be, and replace WARNING MESSAGE with what you would like the warning message to be.

$.errorControl = function(startDate, endDate, numOfDays, errorColour, load) {
  if ($.dateCheck(startDate, endDate, numOfDays)) {
	$.setErrorColour([startDate, endDate], "");
  } else {
	$.setErrorColour([startDate, endDate], errorColour);
	if (load !== true) player.callDialogMessage("Error", "WARNING TITLE", "WARNING MESSAGE", true, true);
  }
}
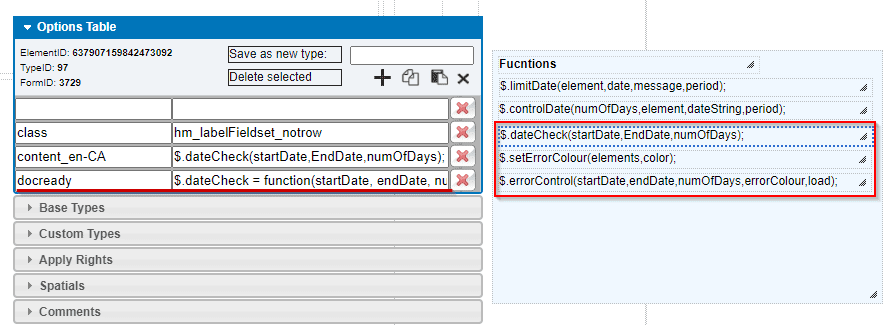
Now that the functions are set up, the next step is to set up the datepickers and specified length field. In this example the specified length field “Trip Length” is simply a text box, however this will also work with a dropdown. All that is needed to set these up is to add the id attribute with a descriptive value. The id’s used in this example are tripLength, tripStartDate, and tripEndDate.

The only function which need to be called on the datepickers / specified length field is $.errorControl(startDate, endDate, numOfDays, errorColour, load);
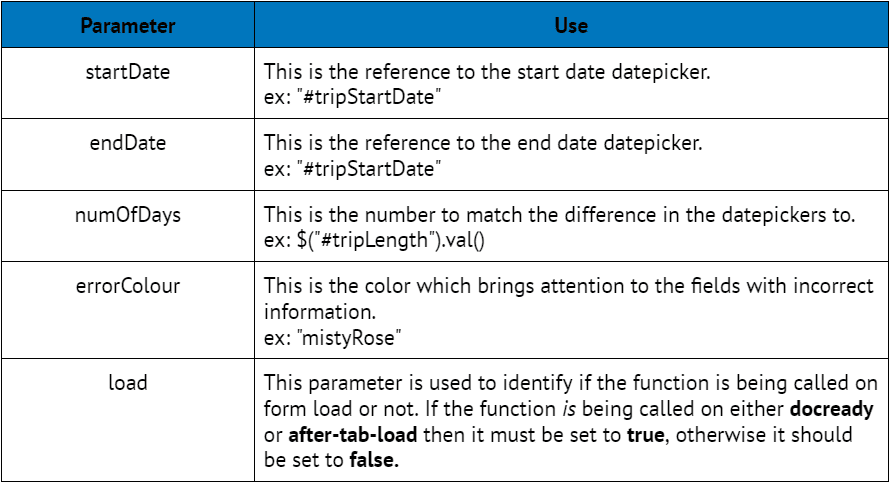
The following should be used in the onchange attribute of the datepickers and specified length field:
$.errorControl("#tripStartDate","#tripEndDate",$("#tripLength").val(),"mistyRose",false);
Replace tripStartDate, tripEndDate, and tripLength with the ids of the start date datepicker, end date datepicker, and specified length field respectively.
For the after-tab-load attribute on these fields, use the previous line of code, however change false to true.
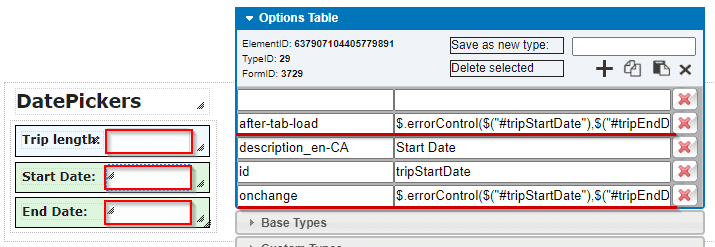
The form should now throw an error message when the dates are not in line with the specified length, and the datepicker fields should highlight in red when they are incorrect.
Automatically Update Datepickers
The first step to automatically update a datepicker to be a specified amount of time from another is to create a function which will update the value of one datepicker when another is changed. On a container outside of the tabset add the following code to the docready attribute:

$.controlDate = function(numOfDays, element, dateString, period) {
  let days = parseInt(numOfDays) || 0;
  if (period == "start") days = -Math.abs(numOfDays);
  $(element).updateDate(FCF.time.offsetDate(dateString, days));
}

Now that the functions are set up, the next step is to set up the datepickers and specified length field. In this example the specified length field “Trip Length” is simply a text box, however this will also work with a dropdown. All that is needed to set these up is to add the id attribute with a descriptive value. The id’s used in this example are tripLength, tripStartDate, and tripEndDate.
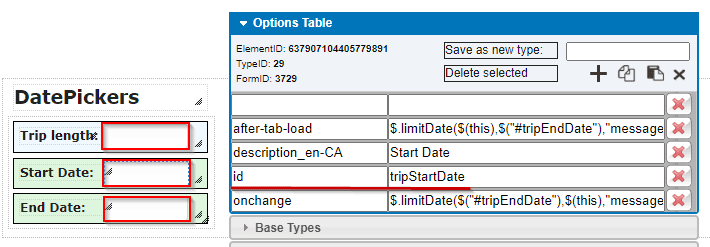
This function will be called in the onchange attribute of the start date and end date datepickers and optionally in the specified length field as well. $.controlDate(numOfDays, element, dateString, period)
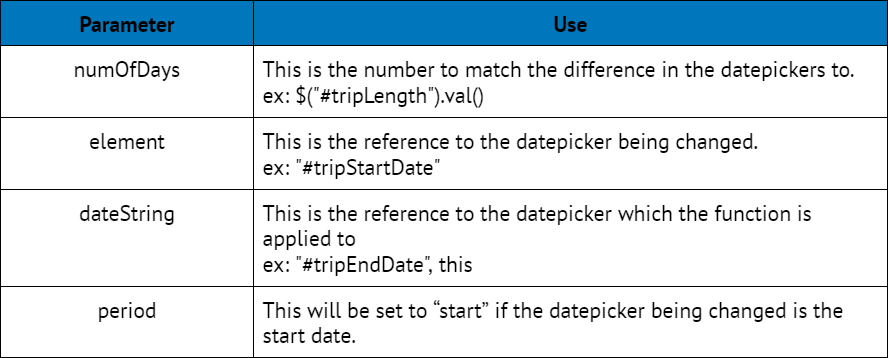
The following table will outline example code for each of the date pickers. Replace “tripLength”, “tripEndDate” and “tripStartDate” with the ids for the specified length field, the end date datepicker, and the start date datepicker respectively.

$.controlDate($("#tripLength").val(), "#tripEndDate", "#tripStartDate");
$.controlDate($("#tripLength").val(), "#tripStartDate", "#tripEndDate", "start");

A method of good practice when using this function would be to apply the disabled attribute to the end date datepicker and to apply the same code in the start datepicker row above onto the specified length field’s onchange attribute as well. This will allow users to enter a start date and specified length in any order and will automatically set the end date. If being able to enter either the start date or end date is a requirement then do not apply the disabled attribute but maintain the code on the specified length field so that if the length is changed after setting the date, the dates will update.

