When I click print I receive an error message, a new tab of clevr opens, or nothing happens.
ERROR MESSAGE
If you receive an error message when clicking print, try triggering a change to the form – update a field, let the perimeter turn green to indicate that it saved, then change it back. The error could be cached, triggering the form change will force the cache to clear. If this does not resolve the issue please contact the clevr Support Team and include the form and student name for resolution.
NEW TAB OF CLEVR IS GENERATED
This can happen if there is a field on the form with too many lines of text in it – when there is more than an entire page’s worth of text within a field, the printout can not allocate space for the text and it causes the error message. If you see a field that has too much text in it you can try reducing it to see if the page will print – remove any unnecessary formatting and extra spaces. If you are unable to find this text area please contact the clevr Support Team and include the form and student name for resolution.
NOTHING HAPPENS
If you click print and nothing happens, it is because popups are blocked within your internet browser. Please see our Printing Support – Enable Popups article here for instructions for enabling popups.
Why can’t I enter data into some parts of the form? The fields appear to be greyed out or fields appear to be missing.
ROLE MISSING PERMISSION TO THAT SECTION OF THE FORM
Access to different forms, modules, and even different fields within the same form are controlled depending on your role in clevr. If there is a section of the form that you can not access but a colleague can, it is likely because you are assigned a different role with different access. If you believe you require access to a section that you do not have permission to, please check in with your divisional lead who can request an access update from the clevr Support Team.
LOCKED HISTORICAL RECORD
Check the school year and any date fields within the form – if you are looking at an older record from a previous school year, the record could also be locked which means that further edits are not possible. Please feel free to contact the contact the clevr Support Team with any questions you may have.
I am trying to use import data but it’s giving me a failed message / the field I want to update is not updating. What’s happening?
IMPORT DATA FAILURE MESSAGE
If you received a failed error message when attempting to Import Data, check to make sure the location selected in the top right location dropdown matches the one the student is enrolled at. Import data does not work when “All locations” is selected.

FIELD NOT UPDATING
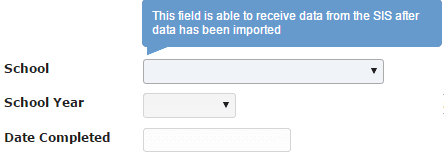
If the field is not updating, first check to make sure the field is flagged to receive data from your SIS. Fields that are flagged for Import Data have a blueish / greyish colour and say “This field is able to receive data from the SIS after data has been imported” when you hover over them.
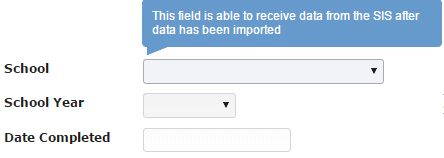
If the fields have been flagged but no data is being populated into these fields when Import Data is triggered, it is likely because there is no information within the corresponding field in your SIS. You will need to populate the data into the source field before you can import it into clevr.
How do I change the status of a record (lock / unlock)?
Within clevr, a record can have one of two statuses – active or locked. An active status means that the record is able to be modified. When locked, a record has a read only status so further edits can not be made. Records can be manually set to active or locked status within the Record History.
The Record History can be accessed via Records > Record History.
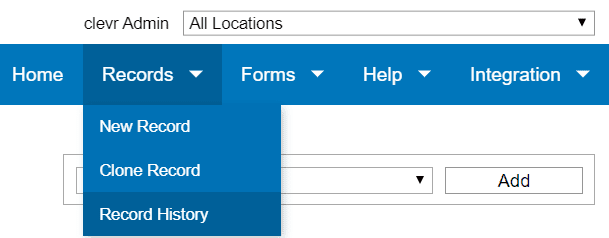
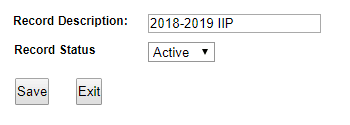
Select the record you would like to unlock and click the notepad icon to the left of it. This will open a dialogue box where you can change the status of the record.

Set the status to either active or locked depending on your needs, then press save. The record status will be changed.
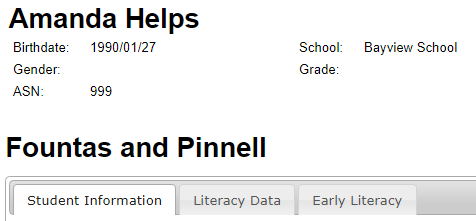
When I click import data, the fields on the form updates, but the section above the form does not.
The section above the form is called the ribbon. This section is updated by the nightly integration, Import Data has no affect on it.
Fields that are flagged for Import Data have a blueish / greyish colour and say “This field is able to receive data from the SIS after data has been imported” when you hover over them.
I accidentally deleted a record. How can I get it back?
REMOVED FROM THE HOMESCREEN
The red X on the Homescreen is more of a hide-from-this-list button than it is a delete button. All you need to do is add the student back to the form and all data will be present.
To find out how to begin a form, please see our Add a Person to a Form article here.
DELETED FROM THE RECORD HISTORY
If the record has been deleted from the Record History you are not able to recover it on your own. Please contact the clevr Support Team to have it restored.
Is there a way to spell check records?
Use the Spell Check tool to check the spelling of data you have entered within clevr. This tool is located in the top right corner of any form. If a spelling mistake is found you will have the option to change, ignore, or replace the word in a pop up box. (Note: You must have pop ups enabled in your browser to use Spell Check).
Spell Check works on a single tab at a time, it is not possible to spell check the entire form at once.

How do I create records for staff, students, or schools?
CREATE A RECORD FOR A SINGLE PERSON
In clevr, a Person is the subject of a form. This can include students, staff, locations, etc. Please follow these instructions to add a person to a form.
Select the desired school from the Locations dropdown found in the top right corner of clevr.

Click the Add button on the Homescreen.
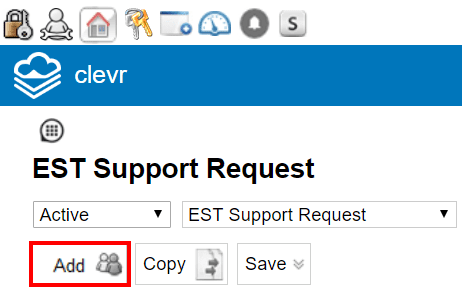
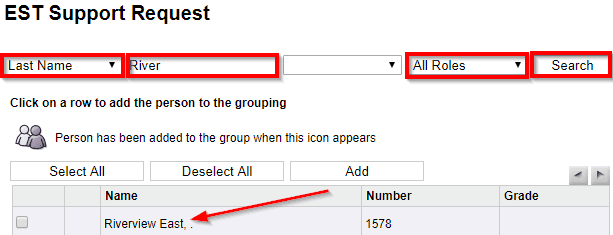
Within the Add Person screen, you will have four options for searching: Last Name, Student Number, Grade and First Name. The most commonly used search option is Last Name.
You will need to make sure that either “All Roles” or the role that matches the person is selected within the roles dropdown (ex: school, school admin, etc). Type in the first few letters of the person’s last name within the text box provided and click Search. You will be presented with a list of results. Once you locate the desired person, click on their name to add them to the form.
ADDING MULTIPLE PERSONS TO A FORM
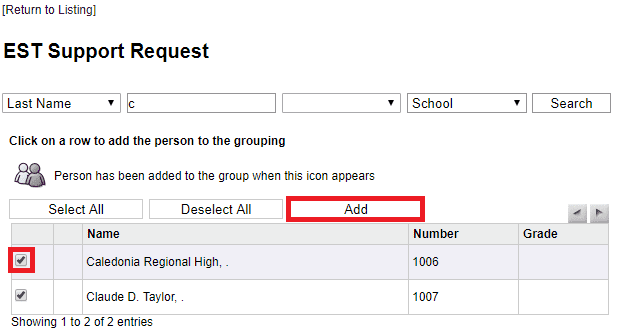
If you need to add more than one person at a time, follow the same steps as indicated above, except this time you will check the checkbox to the left of each person listed that you would like to add.
After you have selected your desired persons, click the Add button. You will receive a prompt asking whether you want to update the selected persons via Bulk Data Entry. Click the Cancel button and the selected persons will appear on the Homescreen. From here you can individually click each person and start adding data to the record.
Why am I receiving an error message when I upload a file to Files & Links?
This happens when you upload a file that is over the maximum file size of 10 MB. To resolve the issue reduce the size of the file (either by compressing it or by removing some pages) and re-upload.
Can I email a printout to parents?
Printouts can not be emailed to parents from inside clevr using the email function – for security purposes, emails can only be sent to division based email addresses. Printouts can still be sent to parents from your own email.
Once the printout has been generated (if you are unsure how to print, please see our Printing article here), look for a download button to save the PDF to your computer. Once you’ve saved the file you can attach it to an email. The download button is located in different places on different internet browsers.

GOOGLE CHROME
In Google Chrome, the download button is in the top right corner and appears only when you move your mouse around.


MOZILLA FIREFOX
In Firefox, the download button is located in the top right corner.


MICROSOFT INTERNET EXPLORER
Within Internet Explorer the download button can be found at the bottom of the screen in the center.

There is information missing from a record I was working on / the entire record appears to be blank. What should I do?
MISSING DATA
If there is a chunk of missing data, it is possible that your connection dropped and that saving did not occur. Please review our Saving in clevr article here and contact the clevr Support Team including the form and student name for more information.
ENTIRE RECORD IS BLANK
If the entire record is blank, it is likely because someone accidentally clicked Records > New Record which made a blank new record on top of the one with the data in it. If this happens the unnecessary record can be deleted from Records > Record History.
Is there a character limit on text fields?
The character limit for text fields is 4,000 characters. This is the maximum number of characters that can be entered into the field, it does not guarantee that the printout is able to accommodate this amount of text.
Can I see the records of students who have left the school / district?
In clevr, a student can have one of three statuses. The status of a student is determined based on their setup within your Student Information System (SIS – Ex: Maplewood, PowerSchool, Tyler, Follett, etc). Student status is updated automatically each night when the SIS Integration runs:
-
Active – Current students
-
Inactive – Students who have left the district (Ex: move, graduation)
-
Pre-registered – Students who have been added to your SIS who have a start date in the future (Ex: in the Fall new K students are pre-registered after they have been added to your SIS but before the first day of classes)
Students are automatically filtered based on their status. You can control the status of the students you see on the Homescreen by changing the status dropdown which can be found to the left of the forms dropdown.
By default this dropdown is set to active which displays only current students on the Homescreen. When a student changes schools or leaves the district / division they will automatically move to the inactive list. You can still find these students by changing this status dropdown to inactive and clicking the search button.

Within the Add Screen you will find another status dropdown to control which students you add to a form. Select the appropriate status, enter your search parameter, and press search.

How can I see historical / previous records for a student?
Historical records can be accessed / viewed via navigating to the Record History while you are while you have the most recent record open.
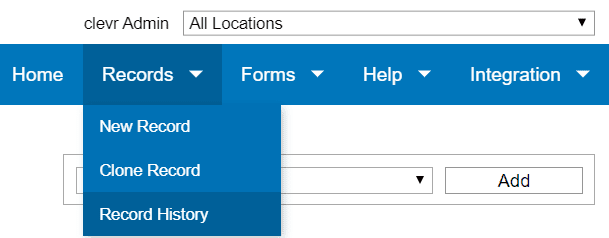
Any previous records created for that student will be available. Click on either the pencil icon or the record description to open the record.

