Editor How-To
Advanced Form Locking
Overview
In some cases the custom type for locking a form will not meet the requirements for the form, especially in the case that the desired outcome is to lock the record based on a specific trigger. For this reason, there is the lockRecord() function. This document will outline this function as well as cover how to apply it in multiple different scenarios.
Javascript Function
lockRecord()
This function works by checking its parameters, taking in data about the user who triggers it, applying desired data to the record, and finally locking the record to prevent any further changes. If the function encounters an issue at any point, no information/data is changed and the form will not lock.
The function template is as follows:
The next table will outline the parameters while a more detailed explanation will follow.
As a reminder, selectors can reference a class, id, or elementId
| Parameter | Description |
|---|---|
| checkboxSelector |
This will be a selector which will reference a checkbox which will control whether the form locks or not based on its state. The checkbox this references must have the attribute class with the value “unhook” applied to it. ex: |
| nameSelector |
This will be a selector which will reference the field which will display the name of the user who locked the form. ex: |
| dateSelector |
This will be a selector which will reference the field which will display the date on which the record was locked. ex: |
| extraElementsArray |
This can be an object or array of objects which allows extra extra fields to have data applied to them besides the default checkbox, name, and date. The objects used require an attribute of either “selector” or “elementId” which will reference the field you wish to affect, and the attribute “value” with the corresponding value to that field. If the field is in a repeater, then the attribute “instanceId” will also be required. ex: |
| description |
This is what will be displayed on the record history under “Description”. ex: |
checkboxSelector
There are multiple ways to utilise the checkbox being referenced as the checkbox selector. The core functionality is that the record will not lock if the checkbox is not checked. This allows for the ability to account for multiple use cases. This checkbox must have the attribute class with the value “unhook” (no quotes) applied to it.
- Have the checkbox disabled and force it to be checked using updateCheck() just before lockRecord() is called. An example call would look like this:
- Have the checkbox disabled, and force it to be checked based on some other trigger, such as a required field being filled out. In this way the record will be prevented from locking if specific actions have not yet been taken on the record. It is important to note that there should also be a call to uncheck the checkbox if the required action is undone / the field is emptied. This is also a method of leaving it optional on whether the form gets locked or not when lockRecord() is called in the event that the same action which calls it also performs other actions.
- Have the checkbox enabled, leaving direct access to whether the record will be locked or not, or allowing a sort of override if the box is automatically checked from some other action.
- Have the checkbox enabled and use it as the trigger to lock the form. For this case, if there is nothing specified under the “extraElementsArray” parameter, or other specific requirements, then the Signature: Finalization custom type should be used instead.
nameSelector
The name selector is a simple parameter which takes the name of the user who locks the form, and applies it to a text field. It is best practice to use the custom type Common: Label | Textbox, changing the content_en-CA attribute of the label to something along the lines of “Locked By:” and applying an id or class attribute to the custom type’s textbox. This will be the id you reference in the parameter in the format of “#id” / ”.class” (quotes included).
dateSelector
Like the name selector the date selector is a simple parameter. This parameter takes a selector referencing a datepicker/text field, and will apply the date the record was locked to it (today’s date).
extraElementsArray
Unlike the name and date selectors, this is a more complicated parameter. The default value should be “undefined” if its function is not required. The extraElementsArray parameter will take in either an object or an array of objects, and apply data to the form based on them. The objects will have the properties of selector/elementId, and value. If the field being referred to in the object is in a repeater, then it will also need the property instanceId.
A single object follows the following format:
If the object is referencing a checkbox, then the value of “true” will have it checked while a value of “false” will have it unchecked.
If there are multiple extra elements, they can be grouped together in an array. To do this you have all the objects on one line, separated by commas, and surrounded by square brackets [ ]. For example:
description
The description parameter takes in a string and displays it as the description on the record history page. If the description is a concatenation of multiple items then it should be stored in a variable, and that variable should be called in the lockRecord() function. For example, the form may have a field where the user inputs a specific topic of the record. The value of this field can be acquired and concatenated to a string in order to form a unique description of the record.
Examples
lockRecord() Basic Form Setup
All examples will require a basic set of fields in order to properly utilize lockRecord().
- The base required elements will be a checkbox, a trigger, a textbox, and a datepicker/another textbox. If lockRecord() is on the onchange attribute of the checkboxSelector checkbox, then that checkbox will count as the trigger. Any extra fields used for the extraElementsArray parameter should also be added before proceding. The following key outlines what is what in the fields used for this example.
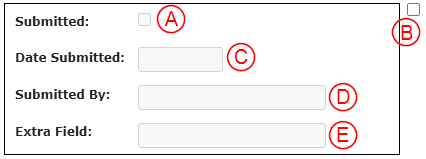
A – checkboxSelector checkbox
B – Optional Triggering element (“the trigger” from now on; doesn’t have to be a checkbox like in the above image)
C – datepicker/text field (dateSelector; a datepicker is used in these examples)
D – Textbox (nameSelector)
E – Textbox (extraElementsArray) - On each of these fields add the attribute disabled with the value of true. If the checkbox is the trigger, then do not add this attribute to that field. Also add the attribute id with the value being a descriptive key which you will use to reference to its respective field. It is also best practice to add a description to each field.

- On the checkbox add the attribute class with the value of unhook.

Note: With exception of the checkbox and trigger, these default fields don’t necessarily need the disabled attribute, however their value will be overridden before locking the record, so whatever was in the field will be lost and it will no longer be editable.
Second Note: It is good practice to apply the attribute doNotClone to the trigger/checkbox with a value of true, as well as all other auditing fields. In this way, if there is some mistake on the record which cannot be edited due to it being locked, a copy of the record can be made and new credentials will be created when it is locked again.
lockRecord(): Trigger on a Checkbox
Using the checkboxSelector Checkbox
If the intended effect is to use the checkboxSelector checkbox (cSc) as the trigger, then you don’t need to worry about ensuring the cSc is checked, as the action of checking it performs the lock itself.
- Follow the basic form setup as previously mentioned, excluding the trigger.
- Once all the fields are properly set up on the form, the next step is to create the function call with the appropriate parameters. To keep the code clean, it is recommended that if there is a need for the extraElementsArray parameter or a custom description, then these parameters should be stored in a variable first, then called in the function.
In this example, there is a field on the form labelled “Topic of Submission:” which will be used in the description parameter, as well as an “Extra Field” which will have some text applied when the form is locked.
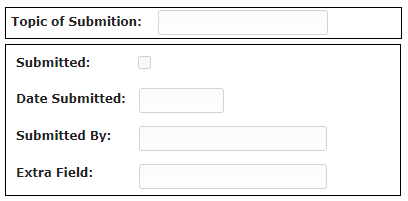
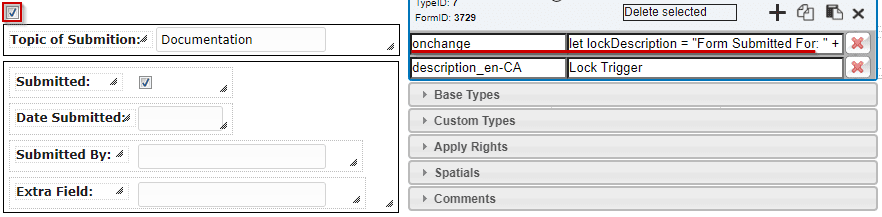
The objective of the function in this example is to lock the record when the submission checkbox is clicked, to fill out the three fields following it, and to use the “Topic of Submission” field value in the description for the record history. The following is the code used in this example.
- The final step is to apply this code as the value of the onchange attribute of the cSc.

Using a Separate Checkbox as the Trigger
f the use case requires there to be an alternative trigger than the checkboxSelector checkbox (cSc), then there is a small change in the procedure. Namely there needs to be a function called to check the cSc, and the locking function needs to be called on a different element – such as a checkbox or dropdown.
The example will outline how to use a checkbox as an alternative trigger.
- Follow steps 1-2 of “Using the checkboxSelector Checkbox”
- The first change that must be made, is that the code now has to force the cSc to be checked when the trigger occurs. The following line of code is a simple method to achieve this.
Replace “submitCheck” with the id of the cSc.
- Make sure this line comes first before calling the lockRecord() function otherwise it will not work properly. Using the example from “Using the checkboxSelector Checkbox” the full set of code would now be the following:
- Apply this code as the value to the onchange attribute of the trigger. In this case, a checkbox.
lockRecord(): Complex Application
The lockRecord() function does not need an isolated call, it can be used in conjunction with other form functions as well. This document will go over the use case where the form has a notification for submission, and when this notification gets sent, the record locks.
- Follow the steps in the basic form setup. In this case the optional trigger will be a notification.
- Set up the notification. Notification Documentation
- Identify any conditions which must be passed in order for the lockRecord() function to be called.In this example, the condition is that the notification must be sent, and that for the notification to be sent there must be a school selected. This example will also make use of a “Topic of Submission” field for the description parameter, and will have extra data passed into the “Extra Field” with the extraElementsArray parameter.

- Write the code for the notification. Be sure to include all conditions so that the notification won’t send if desired fields aren’t complete, and the form won’t lock leaving you unable to edit it.
- Write the code for the record locking. First, a function will need to be created in order to force the checkboxSelector Checkbox (cSc) to be checked. The following line of code is a simple method to achieve this.
Replace “submitCheck” with the id of the cSc.
- Next is to create the lockRecord() function. In this example, there is a field on the form labelled “Topic of Submission:” which will be used in the description parameter, as well as an “Extra Field” which will have some text applied when the form is locked. The following is an example of record locking code including the cSc force check.
- Combine this code with the notification. Using the previously outlined conditions, this is what the combined code would be (for this example, and with comments).
- Apply this code as the value to the onclick attribute of the notification button.
